I"m so sorry but I got behind in the 12 Days of Christmas series. Sickness has taken over our household, and that of two of my daughters, including my baby granddaughter. I think everyone is on the mend, but I am still questionable. I hope that I am able to sneak by...
Today is Day 7 and this day is full of elf mischief. I think you will agree that the Mini Curvy Keepsake box dies from Stampin' Up! are versatile and can be used all year long. Check out the projects I made today. Do you love them as much as I do? Leave me a comment below and let me know which one is your favorite.
Here are the projects. Today I showed you how to create 2 different projects using just one die. You can watch the video by clicking HERE NOW
Here are the products used for today's gifts to give:
Jingle Bells (item #149598)
Making Christmas Bright stamp set (item #148046)
Tags Tags Tags (item #150508)
Mini Curvy Keepsake Box Dies (item #150644)
Christmas Bulb Builder Punch (item #148013)
Trio of Tags Dies (item #150667)
Click the image below to watch the video now:
I hope that you are enjoying the 12 days of Christmas and all of the fun projects.
If you would like to join me on facebook you can find me by clicking HERE
Today only, Wednesday, December 11, Stampin’ Up! Is offering FREE shipping on all of your favorite stamping supplies. The ONLY item that is excluded is Paper Pumpkin subscriptions. Oh, and you MUST purchase at least $50.00 in merchandise before tax is added. That’s it!!! Choose from items in the annual catalog, Holiday catalog AND the clearance rack.
Do you need a gift for someone who is hard to buy for? Do they love crafting? Why not get them a gift certificate to Stampin’ Up! That way they can choose exactly what they want from the new Mini Catalog (formerly known as Occasions) AND they will be able to choose a FREE gift from the Sale-a-Bration catalog too with a $50.00 order. Contact me today at Stampitwithdebbie@gmail.com
Be sure to check back tomorrow for Day 7 of the 12 Days of Christmas and to find out who the winners are from yesterday’s Santa gift giveaway.
It's Day 6 and we are halfway finished with the 12 Days of Christmas. And halfway should be a reason to celebrate, right? It's the season of giving, and today I'm feeling a little Santaish (is that a word???) I would like to give away a few gifts to celebrate the season. You can enter here or over on my Facebook page by clicking HERE Here's how you can enter:
Today's gift to give is an old favorite of mine. In fact, you may have seen me demonstrate it a time or two. I love it that much!!! You can quickly wrap lots of Hershey candy bars to give as gifts AND use up some of your designer paper that you have been holding onto for a special occasion. The good thing about this gift is that they travel well and there's no chance of smushing them during travel.
Another thing I forgot to mention in the video is that you could tape a gift card to the candy bar and then it becomes a gift card holder, too!!! How's that for multi tasking???
For this gift I used the #ELFIE stamp from Stampin' Up! (item #150509). This item can be ordered through my online store by clicking HERE. . If you would like to watch the video now, CLICK HERE FOR YOU TUBE or simply click the image below.
Thank you for watching. Don't forget to leave a comment below of your all time favorite gift you received as a kid for a chance to win a prize from me.
Please remember to subscribe to my newsletter for the latest updates, promotions and ideas.
It's Day 5 and the Gifts to Give just keep coming!!! Today's gift is another 2" x 2" box, but designed a different way than the acetate tiny treat box. This box holds a special Rice Krispie treat, which I purchased at Sams club, but you could most definitely put another treat or gift inside. My original design had the suspenders straight but in the video, I make them crossed in the back. You can choose which design you make.
I only used one stamp set for today's gift, but it is a BIG stamp set packed with so many versatile greetings. This stamp is still available through Stampin' Up! The stamp set is called Itty Bitty Christmas (item #150513) and can be ordered through my online store by clicking HERE
If you would like to watch the video now, with step by step instructions, please click HERE or simply click on the image below.
I hope that you enjoy the Santa Pants video and that you'll come back again tomorrow for another gift to give tutorial.
Happy Happy Day 4 of the 12 Days of Christmas. If you have missed any of the previous days, you can always find the videos over on my YouTube Channel, or scroll back through the days to find them here on the blog.
Day 4 is a yummy chocolate treat inside, with a cup of hot cocoa from Santa on the outside. I didn't have the Cup of Cheer set that is available through Stampin' Up!, so I created my own hot cocoa mug. This matchbook holder has a cute pocket inside that can hold a ghiradelli chocolate, a York Peppermint Pattie or maybe you can think of something different? Leave me a comment below or over on YouTube and let me know what you're putting inside your treat holder. I can't wait to make more of these!!! Watch the video now by clicking HERE or click directly on the link below:
Which gift has been your favorite so far? Leave a comment below.
Come back tomorrow for Day 5 and another Gift To Give.
Welcome to Day 3. Have you been following along since day one? What do you think so far? Leave me a comment below and let me know if you will be using any of the projects this holiday season.
Today's Gift to Give was created using a bath fizzy but you could put lots of things inside of this 2" x 2" acetate box. The Stampin' Up! products used include the Tiny Treat Boxes and the Birds of a Feather stamp set. The boxes and stamp set can both be ordered through my online store by clicking HERE NOW
If you want to see step by step instructions on how to create this gift to give, click HERE NOW or click on the link below with the image.
Thanks so much for stopping by today. I hope you will join me again tomorrow for another gift to give this holiday season.
If you haven't already, I would love for you to join me on facebook. You can find me HERE at stamp It With Debbie
Welcome to Day 2 of the 12 Days of Christmas. Today's Gift to Give is sure to please the chocolate lover on your list. This treat holder has room for three pieces of yummy chocolate. Who wouldn't
love that? PLUS this would make a great table favor or parting gift for your holiday guests. As you can see from the image below, there is a pocket on the front and the back of the treat holder. Snow much fun!!!
Today's project uses the snowman season stamp set from Stampin' Up! and coordinating punch. If you need to order this bundle for your Christmas projects, there is still time. You can visit my online store by clicking HERE.
I have created a video tutorial for this project, and you can clickhere to view the video nowor simply click on the image below.
Will you be creating these cute gifts this year? Leave me a comment below and let me know what you will use them for.
Exciting news!!! I have 12 days of Christmas Gifts to Give just for you. I appreciate you, my customers, so much, that I wanted to give you a gift this season of 12 gift giving tutorials!!! Each day over the next 12 days, I will post either a written tutorial, or a YouTube, step by step video tutorial.
Please feel free to leave me a comment and let me know which projects are your favorites.
Over the next 12 days, I will also be doing giveaways to show my appreciation. Stay tuned!!! Whoa. Merry Christmas to you and you and you!!!
Today's tutorial is all about the tea. My project is filled with delicious Christmas teas, but you could also put individually wrapped cookies or chocolates inside of this packaging too. I can't wait to give this gift to someone special.
Something that I didn't put on the one I created in the video is a poem that I found long ago. It's a great poem to send to someone when you can't be near them during the holidays. Feel free to add this to the inside of your tea holder.
On Christmas Day
At half past three,
Make Yourself
A cup of tea.
I'll think of you
You think of me,
Sitting round
The Christmas tree.
And here is the YouTube video with step by step instructions for you. Just click on the image below and enjoy!
I do hope that you enjoyed this project today. Be sure to stop back again tomorrow for another Gift to Give - Day 2!
There are just 43 Days left until Christmas and I have a fabulously snowy snowman class to go for you. This class includes everything you will need to create 9 projects for giving this Christmas season. You will receive step by step instructions for each project.
Additional products you will need for your Snowman Class to go include: Real Red Ink, Memento Black Ink, Pool Party Ink, Stampin' Blends markers in dark pumpkin pie, light bermuda bay, dark granny apple green and light real red, adhesive and dimensionals. You can order these products with your Class To Go and receive a 10% discount on those supplies, or use what you have. Be sure to include any additional items you need to add on to your kit when you email me to register. (sorry but I cannot add 12x12 paper to your kit for shipping)
Each class will arrive in your mailbox sorted and organized by project. I do all of the cutting, punching and scoring for you (except for what you need to do with your new punch and stamps)
Here is a video showing each of the projects you will receive in your make & take kit.
This Class To Go has four options:
Option #1 - $52.00 plus $8.00 priority shipping
This is the full class and includes:
Snowman Season Stamp set (photopolymer) and Snowman Builder Punch ($32.25 value)
A spool of Real Red Cotton Ribbon ($7.00 value)
Dazzling Diamonds Glitter (that's a FREE gift from me this month)
This is the Class To Go Kit for those of you who already own the Snowman Season Stamp and coordinating punch. You will need to stamps and punch to create these projects, so please only choose this option if you already own them. Your Class To Go kit will include:
A spool of Real Red Cotton Ribbon ($7.00 Value)
Dazzling Diamonds Glitter (FREE gift from me)
Nine Make & Take Projects
Step by Step instructions
Option #1 and #2 both ship priority mail for $8.00. This includes tracking and insurance
PDF instructions ONLY. If you want to cut your own cardstock and already own the stamp set and punch, then this is the option for you. PDF will be emailed on or before the class deadline of November 19th.
This is the option for my Glitter Brigade team members (my downline). Purchase this option for the make & take kits and the PDF instructions. This is a perk for being a member of my team.
All class kits and included product will be ordered and prepared together after the deadline. This is a preorder class only. All product for this class will be ordered after the class deadline, and shipped to you no later than Wednesday, November 27th. Class kits can only be mailed in the United States. If you live outside the United States, you are still welcome to order the PDF.
Registration for this class closes on Monday, November 18th
Class To Go will be shipped on or before Wednesday, November 27th.
Today's projects are all about the Turkey. Do you cook Thanksgiving dinner, or do you go somewhere to celebrate? This year, my second daughter, Haleigh, has a new house, and she has requested to cook dinner for the family. Woohoo!!! I"m excited for her to experience making a dinner for that many people, and I'm also excited that I get to celebrate with her and her husband in their new home.
Which leads me to today's projects. I wanted to bring something to make it a little extra special, especially since I won't be doing the majority of the cooking. So I decided, who wouldn't like to go home with a little treat for later, after the overstuffed feeling of eating too much dinner has worn off.
Each of these projects is fairly simple to create, and in today's video, I give you step by step instructions to follow. All of the dimensions are in the video. I have listed the supplies used below. Don't forget that if you follow the link to YouTube, to click the subscribe button so you never miss a post.
Stampin' Blends markers in dark soft suede, light crumb cake, dark crumb cake, dark pumpkin pie, dark Mango Melody, Light and dark Smokey Slate, Light and dark Balmy Blue, light Real Red
Stampin' Dimensionals (item #104430)
Multipurpose Liquid Glue (item #110755)
If you haven't already, don't forget to follow me on Facebook where I share more project inspiration. You can find me on facebook at facebook.com/stampitwithdebbie.
If you like this project, leave me a comment below and let me know which project was your favorite.
I have a really fun class for you to create for Halloween. There are vampires and pumpkins and spiders, oh my!! This class features the new Spooktacular Bash stamp set from the new Stampin' Up! holiday catalog.
If you have never purchased a "To Go" class from me, let me explain how it works.
Send me a message letting me know you would like to purchase the class. I will send you an invoice or you can mail a check to me. Deadline for payment is October 8th.
I will place all orders for the class at one time and then mail them all out at the same time. Mailing date is October 17th or earlier if I receive supplies earlier. All classes will be mailed out Priority Mail.
For the class fee of $30.00, you will receive all cardstock pieces, the stamp set and a PDF tutorial. Shipping is $8.00 extra or if you are local to me, you can pick it up.
Class fee does NOT include ink or treats to fill your 3d projects.
Other items you will need to complete your class to go include: Black Memento Ink, Highland Heather ink, Pumpkin Pie ink, granny apple green stampin' blends marker, pumpkin pie stampin blends marker, dimensionals and adhesive. Of course, you can add these items to your order, or you can substitute for items you already own.
Here are a few images of the products that are available in the Monster Bash Suite.
If you would like to add any of these, or other items to your order, I would be happy to add them for you as long as they will fit into your priority envelope.
I am offering you the Ornate Frames Dies at a cost of $28.50, which is a savings of over 16% off. Please let me know when you send me an email if you would like to add these to your To Go class.
As of Monday, Fall has officially arrived. And whether you live in an area that has changing seasons, or you are somewhere warm and tropical, it's always fun to create beautiful projects showing the changing colors of fall. I created today's projects using the Gather Together bundle from the Stampin' Up! holiday catalog. These projects would be great for any upcoming fall celebration.
One thing I especially like about this set, Gather Together, is that there are greetings that can be used year round. Below is an image of the stamp set and coordinating dies.
If you missed the live demonstration over on my facebook page, you can click on the link below and watch it now. Don't forget to click on the subscribe button on You Tube so you never miss a project. You can find my facebook page by clicking here now.
In the video, I cut the paper incorrectly for the project, however, the measurements I give are correct. Here are the measurements for the box I created:
Box 4" x 3 3/4", score at 3/4" on all 4 sides
Slider lid 2 5/8" x 6 3/4", score at 1/2" 2 7/8", 3 5/8" and 6"
You will also need a 2 1/4" x 2" piece of window acetate and a piece of very vanilla cut to 1/2" x 2 1/4".
Need supplies for this or other stamping projects? Visit my online store 24 hours a day to place an order. Don't forget that if you use this month's HOST code, I will mail you the make & take kit for these projects for FREE.
Happy Wednesday friends. Today on Facebook Live, I have a really fun project. It's a card, inside of a mini pizza box. And you're going to love it. There's even enough room inside to put a chocolate treat if you choose. Oh, and did I mention that you could even send this through the mail? Could it get any better? Leave me a comment below and let me know if this is the kind of card you would make, and if you would send it in the mail.
Another great thing about this card is that it uses mostly all small scraps of paper, except for the card base and the white fronts. I don't know about you, but I really like being able to create something with my pretty designer paper scraps that might otherwise be thrown out.
Welcome!!!! I'm so happy you stopped by today. I have a great project for you, but first, I want to remind you to click on the follow button so you never miss a crafting post again. Also, if you are on Facebook, but sure to join our fun over there, by clicking HERE
Today I want to show you how to create a card AND a treat holder, all in one, that I created with the stamp set "Celebrate With Cake" (item #149501). And the great thing about this stamp set is that it has a stamp that says "lots of birthday wishes" but also one that says "Celebrate With Cake" so you can use it for so many things other than birthdays. Think about celebrating a graduation, birthday, promotion, great test score, or just for someone you think is extra special and you want to celebrate them.
To watch the video on how to create this fun project, CLICK HERE NOW or click on the image below.
The video gives all of the dimensions, but I have listed them below for your convenience.
Celebrate With Cake Stamp Set (item #149501)
Box Dimensions:
cardstock cut to 5 1/2" x 6 1/2"
score on the 6 1/2" side at 1" and 5 1/2"
score on the 5 1/2" side at 1/2", 2", 3" and 4 1/2"
Designer Paper for box:
1 1/4" x 4 1/4"
3/4" x 4 1/4"
3/4" x 1 1/4"
Card dimensions:
cardstock cut to 4 1/2" x 7 1/4", Scored at 3"
whisper white cardstock for the inside of the card 4" x 4 1/4"
whisper white cardstock for the outside of the card 4 1/4" x 2 3/4"
I hope that you enjoy today's project, and I hope you will stop back again soon to see what else I am creating. If you need supplies for this, or any other project, be sure to visit my online store at Stamp It With Debbie Online Store
Please use HOST code 2EMKWMTY at checkout and receive a FREE gift from me with your purchase of $30.00 or more, before shipping and tax.
Welcome!!! If this is your first time visiting my blog, please be sure to click on FOLLOW so that you never miss a post. I love to share with you, and I don't want you to miss anything.
It's Wednesday and that means it's time for Facebook live over on my business page. You can find me by clicking HERE every Wednesday at 10:00 a.m. Come on over and join us. And don't forget to click the follow/like button so that you never miss a post.
This week I am using a stamp set that you won't find in the new Stampin' Up! catalog. This is a special set that was created especially for YOU... The beginner, the casual and the more advanced stamper. Yes, that's right!!! one stamp for every kind of stamper. And today I am showing you how to create a very basic card, and then how to step it up. But only if you choose to.
Here are the other cards I created for this live event:
If you would like to know how to create these cards, with a live demonstration, click on the link below now to watch the replay. Click here for the YouTube video now
Here are the Stampin' Up! supplies I used for today's cards:
Celebrate with Cake photopolymer stamp set (item #149501)
Whisper white cardstock (item #100730)
Melon Mambo cardstock (item #115320)
Coastal Cabana Cardstock (item #131297)
Night of Navy Cardstock (item #100867)
Highland Heather cardstock (item #146986)
Silver Glimmer Paper (item #146960)
Mango Melody cardstock (item #146989)
Subtles 6x6 designer series paper (item #149615)
Flirty Flamingo stampin' pad (item #117052)
Coastal Cabana Stampin' Pad (item 3147097)
Night of Navy Stampin' pad (item #147110)
Mango Melody Stampin Pad (item #147093)
Melon Mambo Stampin' Pad (item #147051)
Highland Heather Stampin' Pad (item #147103)
Granny Apple Green Stampin' Pad (item 147095)
Silver Metallic Thread (item #138402)
Peacock Noble Rhinestones (item #149494)
If you need supplies for this, or any other project, I would love to be your demonstrator. Please visit my online store by clicking here. Use HOST code 2EMKWMTY at checkout for a free gift from me with your order of $30.00 or more in product (before shipping and tax)
This month I have a beautiful Class to Go to offer you featuring the Free As A Bird stamp set and coordinating Stitched Nested Labels Dies. You are going to love the four cards and two 3d projects that I have designed for you this month. Here is an image of the stamp set and dies that we will be creating with this month:
To complete this class, you will need Memento Black Ink, Calypso Coral Ink, Mossy Meadow Ink, Stampin' Blends markers in Light Old Olive, Light Smoky Slate, Light Crumb Cake, Light Pool Party, Dark Pool Party, Dark Pumpkin Pie, Light Lovely Lipstick, dark daffodil Delight. You will also need snail adhesive, dimensionals and glue dots to complete these projects.
You can use the inks I have recommended, or substitute with colors that you already own.
The class kits will include SIX project kits and a full color step by step instruction PDF tutorial and a video. If you need to add any of the Stampin' Blends markers or inks to your order, I will offer them to you at a 10% discount. Please let me know which inks you need to order when you email me.
Your Class To Go will arrive in your mailbox sorted and organized by project. I will do all of the scoring and cutting for you. All you need to do is print off the PDF that I will email to you and watch the video tutorial that I will send to you.
Watch this video to learn all about This Class To Go:
This Class To go has Four options as follows:
Option #1 - $69.00
This is the FULL Class to Go kit. The following items are included in the kit:
Free As a Bird Cling Stamp and Stitched Nested Labels Dies ($51.25 value)
Full Bolt of White Polka Dot Tulle Ribbon (FREE)
1/6 pack of Bird Ballad DSP
Six Make and Take Projects
Full Step by Step video and pdf tutorial (link will be emailed to you)
When you choose Option #1, you are getting the White Polka Dot Tulle for FREE
This is the Class To Go Option if you already own the Free As A Bird Bundle. You will need to own the stamps and dies to create these projects, so please only choose this option if you already own them. Your Class To Go kit will include:
Full bolt of White Polka Dot Tulle Ribbon
1/6 pack of Bird Ballad DSP
Six Make and Take packets
Full Step by step video and PDF tutorial (link will be emailed to you)
Option #1 And #2 both ship priority for $8.00. This includes tracking and insurance. This amount will be added to the class totals above when I invoice you. If you are local to me (Lansing, Michigan), you can pick your kit up from me and can save on shipping)
Option #3 - $15.00
PDF ONLY. If you want to cut your own cardstock, and you already own the stamp and dies, this is the option for you.
This option is for my Glitter Brigade Team Members only. Glitter Brigade members can purchase this option for the make & take kits and PDF and video tutorial. This is a perk for being a part of my team.
One of my favorite things to do is create fancy folds and 3d items with my paper crafting items. This one has been on my mind for a long time. The key to creating a fancy fold is to make it not so fancy that others, including myself, cannot recreate it without pulling their hair out. This card meets that criteria. And I'm so very excited to share it with you today. If I had to give this card a name, I would call it the Free Standing Spinner Card. That's pretty creative, huh?
Do you have a better idea for the name of this fold? I would love to hear your ideas, and if one sparks my fancy, I would even be willing to change the name. Leave me a comment below.
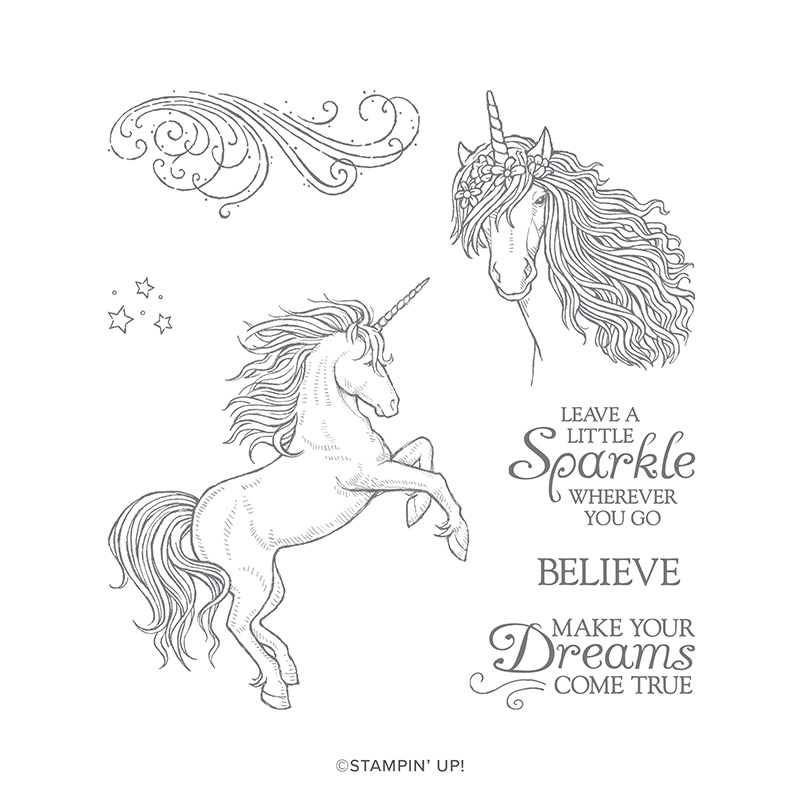
I used the Leave a Little Sparkle stamp set for this card, but just think of all of the possibilities for what you could put in the center. Wouldn't Santa be so cute in the middle for a Christmas card?
I created a video with step by step instructions for you to follow along, but I wanted to give you a few close up images, because I know sometimes still shot visuals are great too.
This card folds flat and can be mailed in a regular sized envelope
The card stands so it can be displayed easily
The unicorn piece spins because it is attached to silver thread
Click on the image below to watch the video now
Be sure to watch the video for step by step instructions. And don't forget to click Subscribe so you never miss a video. If you recreate this card, I would love to see what you made, be sure to share it over on my Facebook page for Sharing Saturday (every Saturday). You can find my Facebook Page by clicking HERE
Did you know that during the month of July, Stampin' Up! is celebrating Bonus Days? For every $50.00 in merchandise you purchase, you will receive a $5.00 coupon to use in August. There is no limit to the number of bonus coupons you can receive. Your coupon will be emailed to you once your order has been received.
If you need crafting supplies for this, or any other project, I would love to be your Stampin' Up! demonstrator. Please visit my online store for all of your crafting needs at Stamp It With Debbie Online Store
It's Wednesday so that means it's time for Facebook Live over on my business page. Today's video is all about sparkle, glitter and treats in a box. Click on the video below for step by step instructions on how to create these three projects. While you're watching, don't forget to click on subscribe so you never miss a video.
Stampin' Up! items I used to create these projects:
Leave a Little Sparkle stamp set (item #149292)
Beautiful Bouquet Stamp set (item #143666)
Stitched Nested Labels (item #149638)
Layering Oval dies (item #141706)
Stitched Shapes dies (item #145372)
Gorgeous Grape Mini Striped Ribbon (item #146940)
Bermuda Bay Mini Striped Ribbon (item #146939)
Noble Peacock rhinestones (item #149494)
Bermuda Bay Light stampin' blends marker (item #144580)
Pineapple Punch dark stampin' blends marker (item #147030)
Brights 6x6 paper stack (item #149613)
Pretty Label Punch (item #143715)
1/2" circle punch (item #119869)
Silver Glimmer paper (item #146960)
Stampin' Glitter (item #133751)
Gorgeous Grape Ink (item #147099)
Coastal Cabana Ink (ite #147097)
Highland Heather Cardstock (item #146986)
Melon Mambo Cardstock (item #1153200
Coastal Cabana Cardstock (item #131297)
If you need items to create these, or any other projects, I would love to be your Stampin' Up! demonstrator. Please visit my online store HERE. Please use HOST code 39ZVUFVC at checkout with your order of $30.00 or more, before shipping and tax, and I will mail you today's projects for FREE.
Hello and Welcome to July!!! I hope your month is starting off well.
This week I had to delay Facebook Live because the internet was a bit wonky on Wednesday. So today I created 3 projects using a brand new stamp set called "Here's to Strong Women". Don't let the name fool you, this stamp set can be used to celebrate both men and women, and I'll show you how in the video. Here's an image of the stamp set I used today.
Stampin' Up! Item #149361
Did you know that each Wednesday at 4:00 p.m., over on my Facebook Page, I do a live demonstration of a current Stampin' Up! product? Come on over and join us BY CLICKING HERE. Don't forget to click on follow so you never miss a post.
In the image above, you can see the three projects, but if you would like step by step instructions, please click the image below. You can pause the video if you need more time to complete one of the steps.
If you need supplies for this, or any other project, please visit my online store today. You can visit HERE. If you place an order of $30.00 or more through my online store, I will mail you the make & take kit for these projects for FREE. Be sure to use HOST code 39ZVUFVC at checkout to qualify.
**** Please note that per Stampin' Up! policy, I cannot mail stamped images. Add this stamp set to your order, or use a similar stamp set to stamp your images.
The Fourth of July is just around the corner. Do you celebrate Independence Day? If so, how do you celebrate? Our family usually has a cookout and we play washer toss outside and we may even have a water balloon fight. It's usually a fun filled family day.
Many years ago we were in California for the Fourth of July and our friends invited us to their home to celebrate. Their town did a great parade and kids decorated their bikes and people went all out to decorate their houses. It was a great time and I long to live in a small town like that. But for now, I will do my part to decorate my yard and celebrate with my family.
I wanted to make a few red, white and blue treats for our celebration. I was surprised that I didn't find more than M&M's, skittles, Twix bars and Little Debbie Snack cakes that were decorated in red, white and blue. So I bought all of them.
Have I told you before how much I love the color combination of red, white and blue. I don't know if it's just that it is a patriotic combination, or if those colors just call to me. Either way, I love creating with these colors.
I started off with clear cellophane bags. (the size that fits a pretzel) Mine are retired from Stampin' Up!, but you can find them at most hobby stores. I filled each bag with red, white and blue Skittles, then sealed the top. I used the Everyday Label Punch and Pacific Point cardstock to cut a piece to use for the tag. I used the Classic Label Punch for the greeting. I used the stars in the stamp set "You Always Deliver" and stamped real red stars randomly over the Pacific Point tag. I stamped the word "Celebrate" from the New Wonders Host set in Pacific Point, then stamped real red stars to the left and right of the greeting.
I folded the Pacific Point Everyday Label punched piece in half and used a mini stapler to staple to the top of the treat bag. I wanted to create a firecracker look, so I used silver metallic paper shred cut into small pieces. I used a small piece of tear & tape over the staple and attached about 10 pieces of the shred to create the firecracker. I cut a dimensional in half and added it to the back of the "Celebrate" greeting and then attached it over the top of the firecracker pieces.
This one only has 6 firecrackers. I ended up added more to get more BANG!!!
And now my treats are all ready to give away at my Independence Day Celebration. I can't wait to share them.
If you have created red, white and blue treats too, come on over to my Facebook page and share what you have created. We would love for you to share. Join me over on Facebook
If you need crafting supplies, I would love to be your demonstrator. Please visit my online store, 24 hours a day, by clicking HERE
If you missed my post yesterday, you're going to want to check it out because it featured three fun cow cards from the brand new stamp set, Over the Moon, from Stampin' Up! There's even a video tutorial.
Today I am sharing another card created with that set. And this card is a WINNER!!! WooHoo!!! Let me explain. Each month my upline for Stampin' Up! holds a team gathering and we create cards to swap with each other. There can be up to 15 people swapping, so we all get really great ideas to share. That's where the winner part comes in. Everyone at the meeting votes on their favorite card, and my card won this month. I was so excited!!!! And I even won a prize for my creation. I will share the other swap contenders at a later time.
Here's my creation:
What do you think? Do you love cows as much as I do? I just can't stop creating with them. You will definitely see them again in my creating.
Here's how I created this card:
Whisper white card base cut to 8 1/2" x 5 1/2", scored at 4 1/4"
3" x 5 1/4" crumb cake embossed with the Pinewood Planks Embossing folder. Apply soft suded ink to the embossing folder before adding the paper and putting through the big shot
Cut embossed pieces to 1" x 5 1/4" and add to the front of the card as shown
Using the stitched Nested Labels dies, cut the largest die using Soft Suede cardstock, and the next to largest using Whisper White.
stamp the 2 cow images onto the white die cut and color with stampin blends markers (I used light crumb cake, light soft suede, light mango melody, black, light petal pink, light flirty flamingo and light smoky slate)
Attach the soft suede and whisper white pieces together (stagger them a bit), then attach to the front of the card using dimensionals
Punch 2 leaves using the leaf punch and granny apple green. Attach to the card front using Tombo multipurpose adhesive
Using the Magnolia Memory dies, cut 2 flowers using Mango Melody cardstock. Attach using Tombo Multipurpose Adhesive
Tie a bow using Pineapple Punch Grosgrain Ribbon and attach using a glue dot
Stampin' Up! product I used to create this project:
Pineapple Punch Grosgrain ribbon (item #146953)
Leaf Punch (item #144667)
Stitched Nested Labels dies (item #149638)
Pinewood Planks embossing folder (item #152320)
Magnolia Memory Dies (item #149578)
Over the Moon Stamp Set (item #149331)
Whisper White cardstock (item #100730)
Mango Melody cardstock (item #146989)
Crumb Cake cardstock (item #120953)
Soft Suede cardstock (item #115318)
Granny Apple Green Cardstock (item #146990)
Soft Suede ink (item #147115)
What do you think? Leave me a comment below to let me know if you enjoy the cow stamp as much as I do. Don't forget to follow me here, and over on facebook, for lots of creative ideas.
If you need supplies, for this, or any other project, I would love to be your demonstrator. Please visit my store here: Stamp It With Debbie's Online Store
This week is an exciting time at Stampin' Up! We got a brand new annual catalog with new colors, stamps, papers, dies. punches and embellishments. I am so very excited to share this new catalog with you. It seems like every year the catalog gets more and more exciting!!!
Each week I will be sharing new product and ideas with you from the Annual Catalog through step by step video or written tutorials and posted images here on my blog, and over on my facebook business page. I hope that you will enjoy all of the new product as much as I am.
Some important links for you:
Find me on Facebook here: Share projects you are working on, join in on fun contests, leave me a comment to let me know the projects you like or would like to see me feature and get creative ideas
Sign Up to Become a Stampin' Up! Demonstrator Want to get a discount on all of your favorite stamping supplies? Join my team "The Glitter Brigade" now and you can get $125 in your choice of merchandise for just $99.00 plus tax. You receive FREE shipping on this order.
Today over on my facebook business page, I featured a brand new stamp set called Over the Moon. It's absolutely adorable. My favorite kind of stamps are whimsical, and this is just one of the new stamp sets that fits this category. I can't wait to show you the others.
If you haven't heard already, every Wednesday at 4:00 (EST), over on my Business Facebook Page, I do a live demonstration using a current Stampin' Up! stamp set. If you missed the live demonstration, you can click on the image below to watch now:
In addition to the FREE live demonstration, if you head on over to my online store and make a purchase of $30.00 or more (before shipping and tax), I will send you a FREE make & take kit for this week's projects. You MUST use this weeks HOST code D2VVMA6V at checkout in order to receive your FREE kit.
***Per Stampin' Up! policy, I cannot stamp the images for you. I will mail you all of the cardstock, designer paper, ribbon and embellishments needed to create these projects.
Stampin' Up! products used for today's projects:
Whisper White Cardstock (item #100730)
Highland Heather Cardstock (item #145986)
Petal Pink Cardstock (item #146985)
Crumb Cake cardstock (item #120953)
Mint Macaron Cardstock (item #138337)
Magnolia Lane Designer Series Paper (item #149484)
Over The Moon Cling Stamp Set (item #149331)
Polka Dot Tulle Ribbon, White (item #146912)
Grosgrain Ribbon, Pineapple Punch (item #146953)
Textile Ribbon, Mint Macaron (Item #149480)
2019-2021 In Color 6x6 Designer Series Paper Stack (item #149617)
Butterfly Gala Stamp Set (item $148580)
Butterfly Duet Punch (item #148523)
Stampin' Blends markers in light soft suede, light crumb cake, basic black dark, petal pink light, light flirty flamingo, light smoky slate, light mango melody, dark pineapple punch and light real red.
I hope that you enjoyed today's live demonstration. Be sure to click on the follow button so you never miss and post. And don't forget to join me over on my facebook page.