Thursday, September 28, 2017

Stampin' Up! Sheltering Tree

It's the perfect time of year for a Sheltering Tree


Fall has officially begun and as I looked through my stamps to create a few fall cards, I came across a stamp set that had gotten pushed to the back of the shelf.  It did not get overlooked because it's not a great set.  I think sometimes we get so caught up in some of the beautiful, new sets, we forget about the old.   This stamp set reminds me of a beautiful fall day, leaves falling, last bike rides of the summer.  But it also reminds me of winter, summer and spring.  I even remembered that I had a few samples that I had created so I pulled them out to show you just how versatile this set can be.   I will be creating a few fall cards from this set, and I will share them with you at a later date.

The card below is definitely a hot summer day.  The leaves are green and the bike is waiting for someone to come take it for a ride. The sentiment "thinking of you" could say "hey, remember when...."   When I was a kid, I liked to climb trees at my grandpa and grandma's house.  There is one tree in particular that I remember.  My cousin and I were climbing the tree, and I remember it being a little high up to the first branch, but that branch was the perfect angle to hang from.  Apparently grandpa thought we didn't know how to do a flip to get out of the tree, so he grabbed ahold of the branch, wrapped his legs around it and then proceeded to flip out of it.  Do you remember doing that from the monkey bars as a kid?  I still remember that day like it was yesterday. 


 My grandpa has not been with us for many years, but on a visit to see my grandma, I drove by their old house and the tree has grown.  40 years has caused that branch to grow much higher, but its still there.   I secretly wished that I could have stopped and climbed that tree just one more time.   After much looking through my pictures, I finally found it.  Here it is.....THE tree.  The lowest branch on the right is the one.  The only thing it's missing is a bike. 


I had not intended to share the climbing tree picture with you today. In fact, I didn't remember I even had this picture until I started writing this post.   I had actually intended to share several other cards made with the Sheltering Tree stamp set, but I think now that I will just share one more, and I'll save the others for another day.   These cards give you a great idea how the different seasons can be represented.


Thank you for reminiscing with me.  I hope that these seasonal cards brought back some fond memories for you,  too. 

If you need supplies for this, or any other project, please visit my store by clicking HERE!  Please use hostess code 7WJRC6DJ at checkout.  As always, I wish you Happy Stamping!

Debbie


Wednesday, September 27, 2017

Have Yourself a Beachy Little Christmas


Are you dreaming of a white Christmas?


I have already spent one Christmas in Florida, and I have to say, it just doesn't feel like Christmas without snow to me.  But I have met many people that say they would trade in snow for sand at Christmas time year after year.  Which do you prefer?  Snow or sand? 

 As the Christmas merchandise is set up in the stores here in Florida, I always chuckle inside when I see signs that say "Let It Snow".  I think merchandisers should create items with melting snowmen, santa in his swimsuit or fluffy white polar bears drinking a Coke on the beach in an adirondack chair.  I think many of the people here in Southern Florida have seen a white Christmas once or twice in their lifetime, and maybe they do, in fact, like to dream of a white Christmas. However,  they would prefer to be dreaming from the beach with a nice cool drink in their hand while basking in the sunshine. 

If you have one of those sunbathing friends, then this is definitely the card for you. 

I created this card with one of our bright new in colors, Lemon Lime Twist.  I like how bright and cheery this color is.  It makes me smile.  In fact, if you have ever been inside my Michigan house, you will know that this color closely resembles the color on my living room and hallway walls.  Even my son said he can't help but be happy when he sees this color. It's good.

Here's what I used to create this card:

  • Lemon lime twist cut at 8 1/2" x 5 1/2"
  • bundle of love designer paper  cut at 4" x 5 1/4"
  • lemon lime twist cardstock cut at 4 3/4" x 3 1/2"
  • Beachy Little Christmas stamp set (item #144857)
  • delicate doilies (item #141701)
  • whisper white cardstock cut at 1 3/4" x 4 1/4"
  • metallic enamel shapes (item #141678)
  • gold embossing powder (109129)
  • markers or blender pen
  • pool party ink, lemon lime twist ink, flirty flamingo ink
  • versamark ink
  • layering circles framelits

This is how I created the card:

  • fold the 8 1/2" x 5 1/2" card base in half
  • attach the 4" x 5 1/4" bundle of love dsp to the front of the card base
  • round the corners of the 4 3/4" x 3 1/2" lemon lime twist card stock piece, Using versamark ink, stamp the beachy little christmas greeting and emboss with gold embossing powder.  Use your heat tool to set the image.    Attach this piece to the top of the designer paper layer
  • using lemon lime twist ink, stamp shells randomly into the 1 3/4" x 4 1/4" whisper white card piece.  Attach this piece to the top of the lemon lime layer.
  • stamp the tree image onto a piece of whisper white cardstock using versamark ink. Cover with embossing powder.  Heat the image using a heat tool.  Once the image has set, cut out using the layering circles framelits
  • color the shells using markers or with the blender pen and ink pads
  • attach the delicate doilie to the back of the circle cut out
  • attach this piece to the top of the white strip stamped with shells using dimensionals
  • add 3 gold enamel shapes to the right upper corner as shown
I hope that you enjoyed this beachy Christmas card and that you will stop back again tomorrow to see what I have been creating.  There are so many great stamp sets in the new catalog.  Check them out at my online store by clicking HERE.  Please use hostess code 7WJRC6DJ at checkout. 

Happy Stamping,

Debbie


Tuesday, September 26, 2017

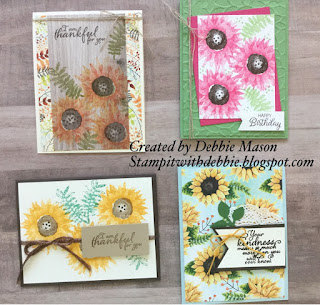
Only 2 more days to get the Painted Harvest Class To Go


I am thankful for you...

There are just 2 days left to purchase your Painted Harvest Class to go.  The deadline is Friday, September 29th.  This class includes the Painted Harvest stamp set, leaf punch, and everything you need to create 5 beautiful cards with envelopes, plus 8 placecards. 

Wouldn't you love to create cards for your friends and family using this beautiful set? 

Cost is $50.00 for the bundle plus 5 cards and 8 placecards, with instructions.  Already have the stamp set and punch?  You can choose to purchase just the tutorial and the paper pieces to create 5 cards and 8 placecards, plus envelopes.  Contact me today by email at stampitwithdebbie@gmail.com and I can send you an invoice.

I can't wait to see you in class.

Happy Stamping,

Debbie

Coffee Cafe' Bundle from Stampin' Up!

Coffee Anyone?

Today's post isn't about a card.  It's actually about a craft fair project I am working on.  I have been in Florida for about a year and a half, and I  have finally found an indoor craft fair.  Paper does not do well with wind, rain and humidity.  And chances are, there's going to be one of those on any given day. 

I found some cute coffee scented candles at the store recently, and they smell delicious.  And they are so cute with the dome lid. I immediately thought of the Coffee Cafe Bundle and how cute this would be as a craft show item, or as a gift for someone you know who loves to drink those fun coffees that all the baristas are making.  In case you haven't seen this set, here it is:


Isn't it great?  There is also coordinating designer paper and some cute little corrugated elements that match this set.   I think this set is going to be great during the holidays to create a gift card holder for all of the special people in our lives.  I'm thinking mail carrier, teachers, co workers....But more on that later.  Check out what I did with the candles:


I created a box for the candle to sit in using cardstock and designer paper to decorate the edges.  I used the framelits and stamps to create a tag that attaches directly to the candle, and then one that I tied onto the gift bag.  I completed the look by cutting a paper straw in half and placing it inside the hole of the lid. What do you think?    Is this a gift that you would like to receive?   I hope the people at the craft show love this idea as much as I do. 

Here are the items that I used to create my project:

  • Coffee Cafe Bundle (includes stamp set and framelits) item #145331
  • Coffee Break Designer Series Paper item #144155
  • Espresso Cardstock  item #119686
  • Jute Twine item #144625
  • Garden Green ink and Espresso Ink
I hope that you enjoyed today's project.  If you need supplies for this, or any other project, I would love to be your demonstrator.   Click Here to Visit My Store Today. Please use hostess code 7WJRC6DJ at checkout. 

Happy Stamping,

Debbie


Monday, September 25, 2017

Twelve Weeks of Christmas - Week 1

Twelve weeks of Christmas crafting Ideas


Today marks just 12 weeks until Christmas.  I can hardly believe it.  Every year it seems like the school year begins,  and the next thing you know,  BAM!!!,  the holidays are here.  So this year I have made it my goal to stay actively on top of the holidays by starting early.  And I hope I can help you, too.  Each Monday I will be sharing a cute treat box or bag, maybe even a recipe, or some other item to help you with your gift giving and decorating tasks. 

Today I am sharing a tutorial for a small box that holds a hand sanitizer.  During the holidays, and really all throughout the year, I like to give small tokens of appreciation to my mail carrier, cashiers, bank tellers or other service people.  I also like to carry these small gifts when I am shopping during the holidays because I like to give them out to other shoppers who look like they have had about all the shopping they can handle.  The smile it brings to their face is priceless. 


I have created a you tube video to help you create this gift box.  What will you put inside?  Share your ideas in the comments below.  Now grab a pen and paper and get ready to get started on your Christmas crafting. Trust me when I say, it is never too early.    I hope you will find the projects I am sharing fun and useful to you this holiday season.

Visit my You Tube video for step by step instructions BY CLICKING RIGHT HERE

Here are the measurements for the hand sanitizer box:

  • base (I used cherry cobbler) cut at 4" x 11" scored on the short end at 1" and 3", scored on the long end at 3", 4", 7" and 8"
  • designer paper pieces cut at (3) at 1 7/8" x 2 7/8", (2) cut at 2 7/8" x 7/8"  and                          (1) cut at 7/8" x 1 7/8"

Don't forget to sign up to follow my blog by leaving your e mail address to the above right so that you will never miss a post. 

Have a marvelous Monday.

Happy Stamping, Debbie

Wednesday, September 20, 2017

September Class to Go

Painted Harvest Class to Go


This month's class to go features the beautiful Painted Harvest Stamp set and coordinating punch.  At first glance this set seems like it might just be for thanksgiving or fall, but look at the cards below that you will receive in your class to go kit.  You can create cards for birthday, sympathy, thinking of you and so much more.   You can create gift bags and place cards. 


Here's what you will receive in you will receive in your September Class To Go
  • Painted harvest stamp set
  • Leaf punch 
  • Supplies to create 5 cards
  • Supplies to create  8 place cards that can be used to seat your guests or to label your dinner thanksgiving dinner feast
  • Printed instructions for all projects
Other supplies needed to complete these projects:
  • Chocolate chip ink
  • Crushed curry in
  • Emerald envy ink
  • Tangerine tango ink
  • Melon mambo ink
Cost for this class to go is just $50.00.  Deadline for ordering is Friday, September 29th.  Kits will be mailed out by October 11 using priority mail. All supplies are included in this fee excluding ink and adhesive. If you do not have the specific ink colors listed, you may place an order for them with the kit, or your may substitute colors that you currently own.  

If you are interested in purchasing this class to go, please email me at Stampitwithdebbie@gmail.com. I will then send you an invoice, or you may pay by check. 

I'm looking forward to seeing you in class.

Debbie 


Tuesday, September 19, 2017

A Little Fun with Stampin' Up! Basic jewels

Tip of the Week....altering the color of rhinestone jewels

I really like it when I can alter a product and use it in a way that is different than it was intended.   Did you know that you can change the color of the basic rhinestones to match your projects using a Sharpie marker? 

Choose a sharpie marker that will match the project you are creating.  In this case, I am using a green sharpie to create cat eyes for my Halloween project.  


The marker must be permanent or the color will not dry onto the rhinestones, and it will wipe off easily.  Color the rhinestones while they are still attached to the original packaging.  See how the color covers the rhinestone, but it still sparkles?  


The rhinestones would look great on this project in clear, but don't they look GREAT in green?  

I hope that this tip will be useful to you when you are creating your upcoming projects.  If you need products for any of your projects, I would love to be your demonstrator.  Please visit my store today BY CLICKING RIGHT HERE. Please use hostess code 7WJRC6DJ at checkout.  


Happy Stamping,

Debbie 


And the winner is....


I apologize for the delay in posting the names of the winners for the diorama cards.  I was in the process of heading back to Florida from Michigan and I completely overlooked posting the names of the winners.    I greatly appreciate all of your comments.  At the request of Sharie, I will be creating a video for the Hearts Come Home Diorama soon.  The winners are Regina, Elaine and Sharie.   Please send me an email with your address to stampitwithdebbie.gmail.com.  I will mail the cards out as soon as I receive your address.  Congratulations ladies!  

Monday, September 18, 2017

It's a vintage kind of Christmas


I think that this year's Stampin' Up! Holiday catalog is fabulous.  There is something for everyone ranging from vintage to modern.   The stamps in this set remind me of  the 1950's and 1960's.   A June Cleaver kind of Christmas if you will.  This particular stamp reminds me of Sally Field's character, Gidgit, from the 1960's.  Aren't they fun?  Here's what I used to create this card:

Here's what I used to create this card:

  • Whisper white card stock cut at 5 1/2" X 8 1/2", scored at 4 1/4"
  • Naturally eclectic designer paper (item #144185) cut at 2" X 5 1/2"
  • Whisper white cardstock cut at 1/2" X 4"
  • Layering Circles framelits (item #141705)
  • Small piece of soft sky cardstock for scalloped circle
  • Lemon Lime twist finely woven ribbon (item #144135)
  • Real red ink & archival black ink
  • Watercolor pencils (item #141709)
  • Enamel dots brights (item #141680)
  • Dimensionals
  • Blender pen (item #102845)

How I created this card:

  • Attach the 2" X 5 1/2" piece of designer paper to the left side of the whisper white card base
  • Stamp the girl with gifts image onto a piece of whisper white cardstock using archival black ink.  Cut out a scallop circle using soft sky cardstock with layering circle Framelit that is slightly larger than the circle you cut for the image. 
  • Color image using watercolor pencils.  Blend and smooth the colors using the blender pen making sure to clean the tip of the blender pen between each color
  • Attach the stamped image onto the soft sky scalloped circle
  • Weave ribbon, as shown, and attach to the back of the circle
  • Attach circles (along with ribbon) the the front of the card, as shown, using Dimensionals
  • Stamp "there's a Merry Christmas in the making" using real red ink onto the whisper white cardstock cut at 1/2" X 4".  Cut a banner on each end as show and attach to the front of the card
  • Attach 3 enamel shapes (red) to the front of the card as shown
I hope you will stop back again to see what I have been creating.  If you need supplies for this, or any other project, I would love to be your demonstrator.  Please visit my store today Click here to shop now.  

Happy Stamping,

Debbie 

Thursday, September 14, 2017

Hearts Come Home with Stampin' Up! This Christmas

Another Christmas Diorama


Did you see the  diorama card that I previously posted featuring the Carols of Christmas stamp set from Stampin' Up! If you missed it, here it is:


I really liked the way this card turned out, and I especially like the fact that it folds flat so I can mail it to someone special.  When I ordered and received the Hearts Come Home Bundle, I created a few Christmas cards and then I wondered how this set would work with a diorama card.  It works beautifully.  The cut house images fit perfectly into the 4" space that creates the card front.  

What do you think?  Which one is your favorite?  Leave me a comment below for a chance to win one of these beautiful cards.  I will choose two random winners from all comments.  


How I created this card:

  • Please watch the you tube video for step by step directions 
  • 2 pieces of whisper white cardstock cut at 7" X 4" and scored at 1" on each long end
  • 1 piece of whisper white cardstock cut at 5 1/2" X 4", scored at 3/4" on each end
  • 1 piece of  night of navy cardstock cut at 4"x4" (for the layer in the back)
  • NOTE:  when cutting house pieces, see measurements below.  Place Framelit as close to the top  of the piece as possible when cutting
  •  Cut the church layer (the back layer) fron a piece of whisper white cardstock cut at 4" X 4"
  • Cut the center layer of houses using a piece of whisper white cardstock cut at 2" X 4
  • Cut the front layer of houses at 1 1/2" X 4
  • Using versamark and silver embossing powder, stamp stars in the sky onto 4"x4" night of navy cardstock, and set with  heat tool.  
  • Stamp the moon image using versamark and white embossing powder.  Set with heat tool
  • Attach the night of navy piece to the back layer of the card then attach the church layer of the framelits
  • Attach each layer as shown in the video.  Adding just one layer at a time
  • Before attaching the top layer, stamp Joy to the world in versamark ink and gold embossing powder. Set with heat tool 
I created a You Tube Video that you can watch CLICK HERE TO WATCH THE YOU TUBE VIDEO NOW.  Don't forget to leave me a comment below on which style of diorama card is your favorite.

If you need supplies to create this, or any other project, I would love to be your demonstrator.  Please Click here to shop now.  Have a beautiful day.

Happy Stamping,

Debbie

Wednesday, September 13, 2017

Bringing You Joy, Peace and Happiness


Today's card features Stampin' Up! Brightly Lit Christmas and Watercolor Christmas. Each of these stamp sets could be used alone, or with other sets to create beautiful Christmas cards.  Did you notice how the lanterns seem to shine through the snow filled night?   You can create this effect by using your favorite yellow ink and a sponge daubber once the image has been adhered to your card.  The snow for this card was created using the berries from the wreath.   Let me show you how to create this card:

What I used to create this card:

  • Real red cardstock cut at 8 1/2" X 5 1/2", scored at 4 1/4"
  • Basic black cardstock cut at 4 X 5 1/4"
  • Whisper white cardstock cut at 3 3/4' X 5"
  • Brightly Lit Christmas stamp set (bundle item #146040)
  • Watercolor Wishes Stamp set (item #144838)
  • Scrap piece of garden green cardstock for wreath
  • Scrap piece of real red cardstock for ribbon on wreath
  • Basic black cardstock for lamp post pieces
  • Daffodil delight cardstock for lanterns
  • Real red, garden green, soft sky and daffodil delight ink
  • Rhinestones
  • Tombo glue
  • Wink of Stella clear (item #141897)

How I created this card:

  • Fold real red cardstock in half using your bone folder to create a firm fold
  • Attach basic black cardstock to the front of the card base
  • Stamp random snowflakes using soft sky ink
  • Cut lamp post pieces from the framelits using basic black for the lamp post and lights and  daffodil delight for the glow inside the the light fixture
  • Stamp the wreath onto garden green cardstock using garden green ink.  Stamp berries onto the wreath using real red ink.  
  • Stamp the ribbon onto real red cardstock using real red ink
  • Attach the pieces of the lamp post as shown using tombo glue. 
  • Using a sponge daubber and daffodil ink, sponge light around the lantern pieces 
  • Attach the wreath to the post 
  • Stamp the words Oh Joy from the Watercolor Christmas Stamp Set using real red ink
  • Attach a rhinestone above the "j" 
  • Paint a little glimmer onto your lamp post and wreath using the clear wink of Stella brush
I hope you will enjoy creating this beautiful card as much as I did, and I hope it makes you think of your favorite small town decorated for the holidays.  

If you need supplies to create this, or any other project, I would love to be your demonstrator.  Please visit my store today by clicking here:  SHOP HERE

Happy Stamping,

Debbie

Friday, September 8, 2017

Stampin' Up! And a special Birthday Delivery


Let's share some birthday memories

Have you seen the stamp set and bundle called Birthday Delivery in the annual Stampin' Up! Catalog?  There are stamps for everyone on your birthday list.  There is a chef stamp, a poodle and turtle and so much more.  You are going to love how vintage this stamp set feels.  

Here's what I used to create this card:
  • 8 1/2" X 5 1/2" black cardstock, scored at 4 1/4"
  • 4" X 5 1/4" crushed curry cardstock
  • Crushed curry, real red and black ink
  • Real red marker
  • Dimensionals
  • Birthday delivery (bundle item #143660)
  • Layering circles framelits (item #141705)
  • Birthday Memories designer paper (item #144118)
  • Enamel shapes brights (item #141680)
  • Silver glimmer paper cut at 1/2" X 4"
Here's how I created this card:
  • Randomly stamp the happy birthday and cake images onto the crushed curry cardstock using crushed curry ink.  Attach this piece to the front of the black cardstock.
  • Cut a circle from the birthday memories dsp using the largest circle from the layering circle framelits
  • Stamp the chef onto whisper white cardstock using black ink and cut out using the largest circle in the laying circle framelits.  Color the chef tie and pastry bag using the real red marker. 
  • Stamp the "let's celebrate your day" onto whisper white cardstock using real red ink.  Cut this piece into 4 separate pieces.  
  • Cut both pieces of silver glimmer paper at an angle on each end
  • Attach designer paper directly to the crushed curry piece as shown.  Add 2 silver glimmer pieces.  Attach chef circle using Dimensionals.   Add the 4 word (let's celebrate your day) as shown using tombo or two way glue.  
  • Add the enamel dots as shown
I hope you have enjoyed this fun birthday card.  Please stop back tomorrow to see what else I have been working on.  

If you need to order supplies for this, or any other project, I would love to be your demonstrator.  Please visit my store BY CLICKING RIGHT HERE

Be sure to follow my blog by clicking the follow button above so that you'll never miss a project.  

Happy Stamping,

Debbie