Friday, December 15, 2017

Week 10 of the 12 Weeks of Christmas


Here we are at Week 10 of the 12 weeks of Christmas.  It's hard to believe that there are just 10 days left until Christmas is here.  I am finding it especially difficult to keep track of the holidays while living in Florida because the weather usually dictates that the holidays are coming.  At home in Michigan, fall and the cooler weather means Halloween, then Thanksgiving, followed by Christmas.  When it is warm most every day, it's hard to keep track of the days.  Although, and I am certainly not complaining, since I know the weather back home in Michigan and other places has been much colder, it has been a bit chilly for Florida the last week.  Even the Manatees are sensing the cooler weather.  I'm going to check on them tomorrow, I'll report back next week. 

This week's Christmas project is a cute gift card holder for any of those last minute gifts that you need to purchase, or the ones that you have already purchased and you need a fun way to wrap them up.   This gift card pattern allows you to get three gift cards from each 8  1/2" x 11" sheet of cardstock.    Here are a few of the gift card holders I created:


Here's what I used to create each gift card:

  • Gift card base cut from cardstock cut at 3 1/2" x 8 1/2".  Score at 2" & 6"
  • Designer Paper cut at
    • 3 1/4" x 3 3/4"
    • 3 1/4" x 1 3/4'
    • 3 1/4" x 2 1/4"
    • white for inside tab cut at 3 1/4" x 1 3/4"
  • Assorted stamps, inks and papers
Cut a gift card base at 3 1/2" x 8 1/2" and score on the long end at 2" and 6".   On the end with the shorter score line, use a corner rounder to round the corners.  I used the notch on the top of my  Envelope Punch Board (item #133774).  Round the corners of both the designer paper and white paper cut at 3 1/4" x 1 3/4" making sure that the design on your paper is aligned in the direction it will be placed onto the gift card holder.  Fold on all score lines and burnish with your bone folder. 

Apply adhesive onto the edges of 2 1/2" edge as shown below.  Here I used tear & tape but you could also use Multipurpose Liquid Glue or Fast Fuse.  Be sure to only apply adhesive along these edges or you will not be able to insert your gift card into the slot.  Remove the backing from the tape and fold inward, creating a pocket. 

Score on long end at 2" and 6"
Round corners on end that is 2".  Place adhesive on the edges of the end that is 2 1/2".
Attach designer paper pieces using fast fuse, snail or multipurpose glue.  Place the 3 1/4" x 3 3/4" piece onto the back of the holder, the 3 1/4" x 1 3/4" piece onto the front top tab, the white piece onto the front inside tab for to/from and the 3 1/4" x 2 1/4" piece onto the front pocket piece.   

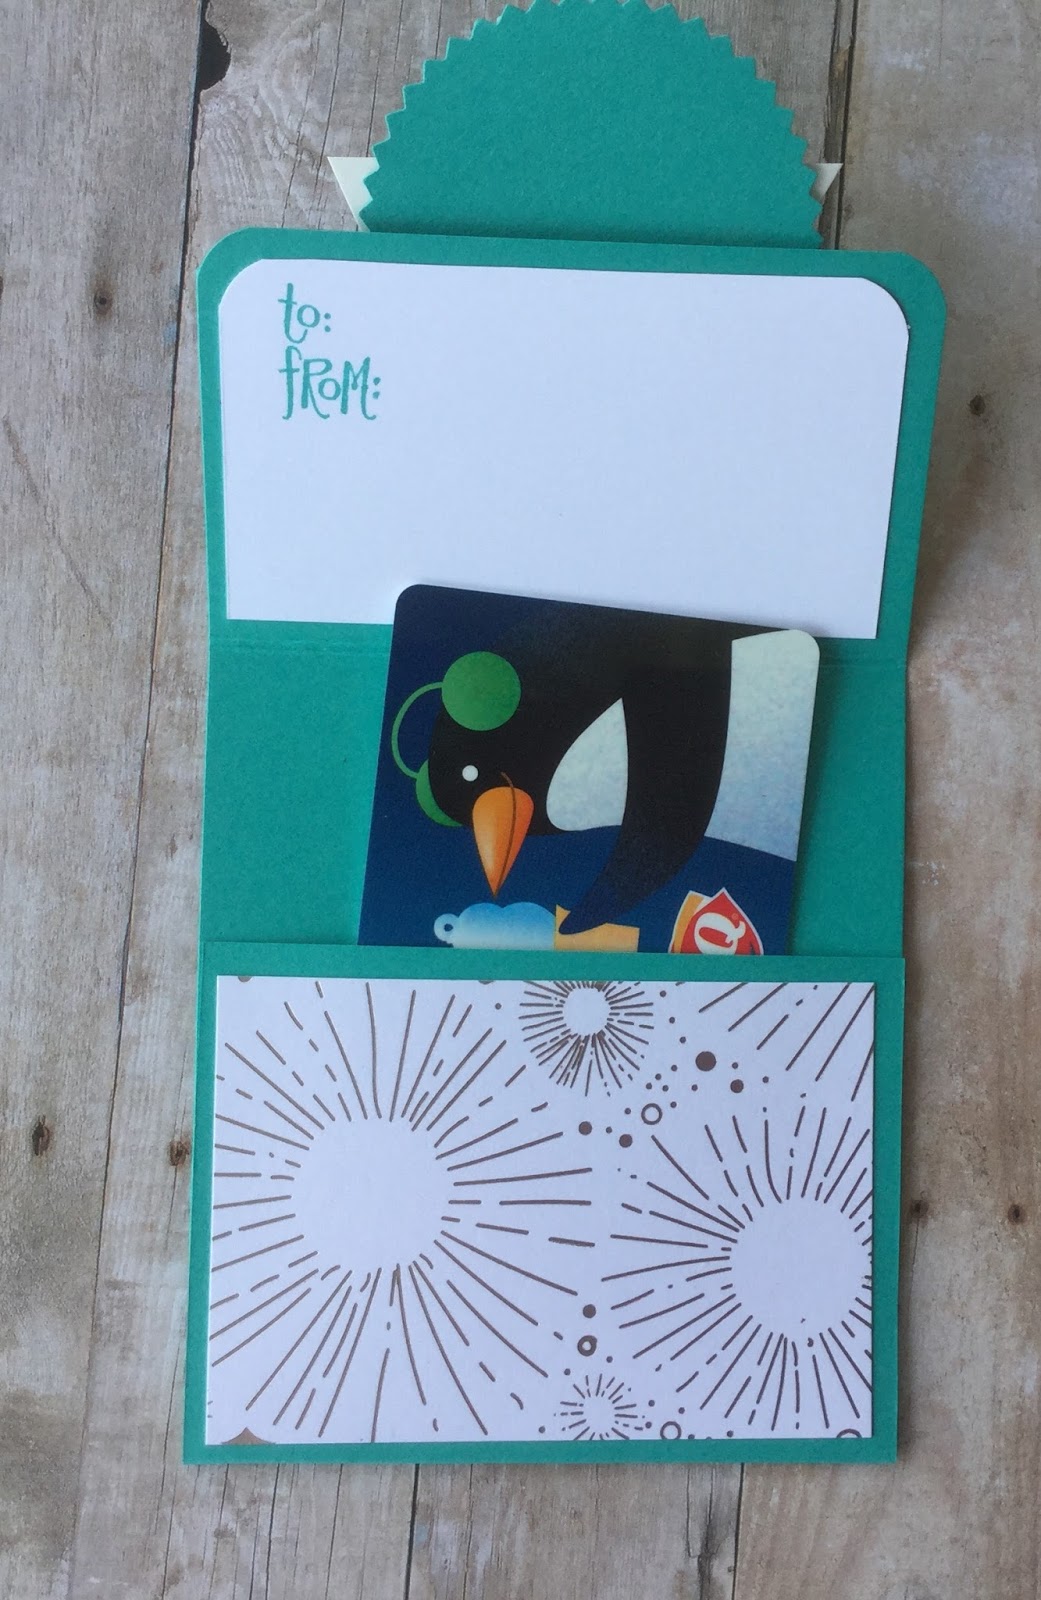
I used assorted stamps sets, framelits and punches to create the  front decorations.  Attach these pieces onto the tab that flips open, making sure to only attach the top half as your gift card will be sealed shut permanently if you apply adhesive to the entire piece.   See image below.   Insert a gift card into the pocket as shown below.  Tie a ribbon around the top of the gift card holder to hold it closed. 


I hope that you are finding the holidays peaceful, and that you are having enough time to do all of the things that make you happy this season. 

If you need stamping supplies, I would love to be your demonstrator.   Please visit my store here

Happy Holiday Stamping,

Debbie


Thursday, December 14, 2017

Christmas Ornament Exchange


This year I was invited to an ornament exchange by my friend Natalie.  The requirements of the exchange were to bring six wrapped ornaments.  Everyone would leave with six new ornaments.  The concept is similar to a cookie exchange.  But I also learned this year that there is such a thing as a wine exchange.  I'm totally organizing a wine exchange next year for sure.  If you want to be on the invite list, just let me know.  I have a feeling there's going to be lots of wine exchanging.  

These are the ornaments I selected.  I do love snowmen.  And I  hoped that everyone else would love them as much as I did.  Well, they did, except I was unaware of the rules of the ornament swap.  Bring 6 DIFFERENT ornaments.  No one seemed to mind, and I will know for next time. 

We all chose a number then made our ornament selections.  Did I mention that all of the ornaments were wrapped?  So we were selecting based on wrapping.  Some of them were wrapped in tissue paper, some in boxes and tins and some in super sparkly, glittery bags.  I really wanted to take all of the sparkly ones, but I chose several different ones.  The catch of this ornament exchange?  If the person with the number behind you wanted one of your ornaments, they had to take them ALL.  Thankfully, no one did that, but at the end, we each swapped with each other to get a few that better suited our Christmas tree needs. 

This year, being in Florida, and it also being my last Christmas living in Florida, I decided to go with a nautical theme.  I have decorated my tree with teal and white lights, mermaids, starfish,fish,  sea lions, sea horses and, of course, turtles.   My turtle tree topper, which is really an ornament posing as a tree topper, was sent to me by my dear friend, Elaine Brockhaus.  What a great surprise to receive it in the mail.   I am happy to say at my ornament exchange, I ended up with a few more ornaments to fit in with my nautical theme including a crab, a sparkly sand shell and a turtle. 

I actually have three trees this year, and they are all decorated with the same type of ornaments.    They are small and are part of a three piece alpine tree set.    Here is the biggest one:


I hope that by now, your tree is up and decorated (if you are choosing to put one up this year), and that you are enjoying the twinkling of the lights and the memories of each ornament that adorns it. 

Merry Christmas,

Debbie

 Click here to follow me on Facebook where I share more fun ideas for crafting.  Don't forget to click on FOLLOW while you  are there.

Wednesday, December 13, 2017

Gift Tags for your Christmas Gifts


How are you doing on time this year?  Do you have all of your Christmas shopping done?  This year I had to do a lot of my shopping online because of being away from home.  I have never done so much shopping online as I did this year.  I am not certain how I feel about it.  I don't mind going out for hours, scouring the stores for the perfect gift.  I do mind grouchy people who think they are the only ones in the store who are tired and worn out.  As I have mentioned before, I am always armed with handmade treats that I can give away to help these people to feel more happy.  It really does work. 

I mailed 60 Christmas cards out yesterday. I was feeling very thankful this year that I took my own advice and I purchased my postage stamps online and had them delivered right to my mailbox.  Did you know you can do that?  Just log into USPS.com and create an account.  They usually have a bigger selection of stamps through their online store.  What a great time saver.    The parking lot of the post office was packed.  I was able to find one of the last parking spots, walk in to the self service mail slot, insert my cards and walk out.  Then mark Christmas cards off of my list.

Now onto gift wrapping.  I like to create handmade tags for my gifts and the Stampin' Up! Scalloped Tag Topper punch makes this task super easy.  I selected a few stamp sets, pulled out my designer paper and cardstock and began the task of creating.  I was able to use up lots of my designer series paper scraps because the tags are just 2" wide.  I create a few whimsical ones with the reindeer and the snowman, and a few beautiful ones with the church, house, trees and stockings.   Here are a few of the tags I created:


Creating these tags didn't take long, and I had so much fun making them.  For each tag, I cut a piece of cardstock to 4 1/4" x 2", then inserted one end into the scalloped tag topper and punched.    I used pool party, garden green, whisper white and very vanilla, but you can really use whatever colors match your designer papers.  You will get 10 tags from each 8 1/2" x 11" piece of cardstock.  I used the tag topper to punch the top of the tags so that I could easily attach them to my gifts.   When I used a back ground piece, I cut it to 2" x 2". 
 
The Stampin' Up! Tag Topper punch makes creating tags so easy.
 
I used several stamp sets to create  my tags because I couldn't choose just one.  I used the Hang your Stockings stamp set with matching framelits.  This set was new to Stampin' Up! last year but is still available for purchase.  This is one of my favorites from last year.  


Here are the stamp sets used for creating the gift tags:

  • Hang your stocking photopolymer stamp set (item #142114)
  • Christmas stockings thinlits dies (item #141841)
  • Tag Topper punch (item #133324)
  • Hearts Come Home bundle (item #146068)
  • Father Christmas Clear Mount Stamp Set (item #14215)
  • Card Front Builder thinlits dies (item #144674)
  • Merry Little Labels Clear Mount Stamp Set (item #144795)
  • Seasonal Chums Clear Mount Bundle (item #146077)
 
I wish you peace and calmness this holiday season as you prepare to celebrate with your friends and family.   Make lists to keep track of tasks, and delegate when possible.  And remember, we still have 11 days  and 2 weekends before Christmas is here.
 
Happy Stamping,
 
Debbie


Thursday, December 7, 2017

Stampin' Up! Year End Sales Event and Stamparatus Tool


Stampin' Up! has introduced a brand new placement tool.  Your stamping projects will never be the same.


This tool will help you perfectly align your stamping images, and will stamp multiples of the same project, saving you time.  This tool was created by stampers, for stampers, and will change the way you stamp.  Before long, you will wonder how you ever stamped without it. 
  • Compatible with red rubber and photopolymer stamps
  • 2 magnets to hold the paper in place
  • rulers on 2 sides for quick measuring
  • 2 open sides so you can use larger paper
  • multiple hinges for more placement options
  • 2 reversible plates for 4 sides to work with
  • 1 foam mat for use with photopolymer stamps
  • 1 base with grid
  • magnet storage areas
You can view a demonstration of the Stamparatus tool here:  Stamparatus You Tube Video

I know you're going to want one, so here's the deal.  Stampin' Up! is taking reservations for this tool RIGHT NOW!!!  From December 5-30, you will make your reservation.  Shipping will begin March 19, 2018.  You will receive your tool in the order that reservations were placed.  You must have a Stampin' Up! online account.  If you don't have one currently, it is very easy to set up.  Once you make your reservation, you will need to enter your credit card information, however, your card will NOT be charged until your Stamparatus ships from the facility.   Click Here


HURRY!  Stampin' Up! is having a Year End Sales Event!  This sale runs from December 1 to January 2, 2018.  Discounts up to 25% off.  Retiring items are while supplies last only, so don't wait.  Your favorite items could be gone forever once stock is depleted.  Visit my store HERE.  Use hostess code 2JZPRHSB at checkout. 

Please let me know if you have any questions regarding these two special events.  I would be happy to help you.

Stop back tomorrow to see what I have been creating in my craft room. 

Happy Stamping,

Debbie


Wednesday, December 6, 2017

Week 9 of 12 Weeks of Christmas


Week 9 of the 12 weeks of Christmas


This week I am sharing a small treat box that holds a miniature Hershey bar or other small candy treat.  I have been looking for new ways to use my designer paper, and this project was a perfect way to display this fun paper.  I think this treat box would be a great surprise for your holiday guests.


Here's what I used to create this treat box:

  • Be Merry Designer Series Paper (item #144111) cut at 6" x 2 1/4"
  • Merry Mittens Framelits (item #144672)
  • Silver 1/8" Ribbon (item #132137)
  • multipurpose liquid glue (item #110755)
  • Dimensionals
  • Glue dots

Here's how I created the box:

  • Score the designer paper on the short end at 1/2" on both ends.  Score on the long end at 2 3/4" and 3 1/4".
  • Fold all score lines and burnish with your bone folder
  • Cut up to the 1/2" score line on both sides where there is a small square (these will be the tabs to create your box)  See image below
  • Fold the center tabs toward the center and apply adhesive to each one.  Bring the sides of the box up to the tab with the adhesive and secure. 
  • Run adhesive along the remaining tab and secure to the back tab to form a box
  • Your box will look like this:

  • Cut two mittens using the Merry Mittens Framelits.  You will need one solid white mitten and one mitten cut from the framelit with the design (this one is placed on top of the white mitten).  I chose Cherry Cobbler cardstock for my top layer mitten.
  • Attach the two mittens using multipurpose liquid glue
  • attach the mittens to the box using a dimensional
  • Tie a box with the 1/8" silver ribbon and attach using a glue dot
  • place treat inside box and give to your favorite guests

If you liked this project, I hope that you will stop back tomorrow to see what else I have been creating.  If you need supplies to create this, or any other project, I would love to be your demonstrator.  Please visit my store by clicking HERE.  Please use hostess code 2JZPRHSB at checkout. 

Happy Stamping,

Debbie


Tuesday, November 21, 2017

Week 8 of the 12 Weeks of Christmas


I greatly apologize for the delay in posting week 8 of the 12 weeks of Christmas.  I have been experiencing downloading difficulties.  I am hoping to have these difficulties resolved by this week.  Thankfully we still have enough time to make it through the 12 weeks before Christmas arrives.  Thank you for your patience.


This week's project uses the Clear Tiny Treat boxes, designer paper and a few embellishments to create a WOW project to give to your friends and family.  I think this box would be a great addition to your dinner table this Christmas season as a gift for all of your guests to take home with them.   You can fill this fun box with treats or even a small gift.  Off the top of my head, besides food or candy treats,  I'm thinking jewelry, bath fizzies, a candle, a small toy...what would you put in it? 

I have listed the supplies used, paper sizes and score lines below, but be sure to click on the link below to watch step by step instructions on my You Tube video. 

Here's what I used to create this box:
  • Clear tiny treat boxes (item #141699)
  • Jute Twine (item #144625)
  • Mini Ornaments (item #144626)
  • Merry Little Christmas Designer Series Paper (item #144621)
  • Green sprigs (item #144627)

How I created this box:

  • Cut designer paper to 2" x 10"
  • Score designer paper at 1", 2", 4", 6", 8" and 9"

 Watch my You Tube Video here for step by step instructions

I hope you enjoyed this project.  Stop back tomorrow to see what else I am creating.  Don't forget to sign up for notifications so you never miss a project.

Happy Stamping,

Debbie

Wednesday, November 15, 2017

Get Ready To Be Amazed

Introducing the Stampin' Up! Stamparatus


This past week, Stampin' Up! introduced a new tool called the Stamparatus.  And you're going to NEED it.  The Stamparatus will change the way you stamp, and once you have it, you will wonder how you every crafted without it. 

Here's what you can do with it:
  • Make multiple stamped images with ease
  • Consistently stamp crisp, clean images
  • If you want a darker impression, apply more ink and restamp, no need to start over
  • Make fewer mistakes, saving time and money
  • Easily create 2 step, 3 step and 4 step stamped images using reversible plates
  • Develop new and specialized stamping techniques with adjustable stamping plates and precision placement
Check out this You Tube Video that shows you exactly how the Stamparatus works:


Okay.  Now that you have watched the video, you're probably wondering How Do I Get One?
 
With the launch of this product, Stampin' Up! is trying out a new reservation system.  There are three reservation dates, and your product will ship during the designated shipping time.
 

Reservation Window                                  Available to Ship

 
November 16-30, 2017                                           Approximately  February 1, 2018
December 5-30, 2017                                             Approximately March 19, 2018
January 15-30, 2018                                               Approximately April 15, 2018
 
 
If you're like me, you probably have a lot of questions now that you have watched the video and you see the information about reserving your Stamparatus.  Here are the answers to some of the commonly asked questions.  However, if you don't see the answer you are looking for here, please feel free to contact me.
 
Q:  How do I reserve my Stamparatus?
A:  Normally you order Stampin' Up! products through the online store; in this case, you will click the RESERVE link on the Stamparatus page which will take you to the reservation page. 
 
Q:  What if I do not have a Stampin' Up! customer account?
A:  In order to reserve a Stamparatus, you must have a customer account.  To create one, click Create Account on the online store.
 
Q:  Why does it take so long for the Stamparatus to ship?
A:  We will place an order with the manufacturer based on how many reservations are made during any given reservation window.  Shipping dates depend on how long it takes the order to arrive in our warehouse after the tools have been manufactured.
 
Q:  Am I billed at the time I reserve the Stamparatus?
A:  No.  However, a credit card is required to reserve the product.
 
Q:  When will I be charged for the Stamparatus?
A:  When inventory arrives in the warehouse, we will add your reservation to a shopping cart.  We will then send you an email notifying you that your Stamparatus is ready.  Once you finalize payment and close your order, the system will charge your credit card
 
Q:  Will I be able to add other products to my Stamparatus reservation?
A:  No.  However, once your reservation is transferred to your shopping card, you wil then be able to add other items to your order.  Important note:  Please do not delete the Stamparatus from your order.  We will not be able to add it back and you will lose your reservation.
 
Q:  Will I be able to update my address and credit card information when I open my shipping bag to complete my order?
A:  Yes
 
Q.  What if I change my mind and want to cancel my reservation?
A:  You can cancel your reservation at any time
 
Q:  Will this tool be available in the 2018-2019 Annual Catalog?
A:  Yes, once the annual catalog ordering period begins, you will be able to order the Stamparatus as you would any other product.  Reservations will no longer be required, and there will be no limit on the number of tools you can order.
 
Q:  Once the stamparatus is added to my shopping cart, how long will it stay there?
A:  Indefinitely.  As with all products, it will be subject to temporary interruptions in availability depending on demand.
 
Q:  How many stamp placement tools can I order per reservation?
A:  For customers, there is a limit of 1 per reservation window
 
Q:  How did Stampin' Up! come up with the name Stamparatus?
A:  We combined two words that speak to the end use of the tool as well as Stampin' Up! branding.
 
Stamp:  To impress a pattern or mark on a surface, object, or document using an engraved or inked block or die or other instrument.
 
Apparatus:  The technical equipment or machinery needed for a particular activity or purpose
 
Stamp + Apparatus = Stamparatus
 
Whew!  That's a lot of information.  If you have further questions, please feel free to contact me.
 
Don't forget to make your reservation starting November 16th, 2017  (as quantities per reservation are limited).  Visit my site By clicking here
 
Happy Stamping,
 
Debbie

Monday, November 6, 2017

Week 7 of the 12 Weeks of Christmas


Have you been in the stores since Halloween has passed?  Have you heard it?   I'm talking about the sounds of Christmas music coming from the speakers of your favorite stores.  And I have already started seeing Christmas ads on tv, too.  With only 48 days until Christmas, no, that's not a typo,  stores are starting early to cash in on holiday sales.  And while I believe that November should be for Thanksgiving and being thankful, I also believe that if we don't start preparing for Christmas now, we will pay later by being stressed and unprepared.  So I have prepared a few time saving holiday tips for you to help relieve some stress for you during the upcoming holidays. 

  1. Plan as many of your holiday dates as you can today. Get them on the calendar now. 
  2. Each week while you are grocery shopping, pick up at least 1 extra gift card.  If you started this week, you could have 5 gift cards by Christmas.  Better yet, next year, starting in January, purchase just 1 extra gift card per month.  By December, you will have 12 cards, and your budget won't feel the crunch as much as it would if you bought them all at once.
  3. Stock up on wrapping essentials now.  This includes wrapping paper, tape, ribbons, gift tags, bows and bags.  Make a list of gifts you have purchased for each individual and wrap them as you purchase them so that you aren't spending hours and hours wrapping the week before Christmas. As a side note to the wrapping tip, and I do not benefit in any way from this, Hobby Lobby has fabulous wrapping paper.  It is very thick and has lines and squares on the back.  Their paper is usually on the shelf by July, and is priced at 50% off. 
  4. Need stocking stuffers?  Check out the dollar stores in your area.  They sometimes receive items that have been discontinued from the regular stores like toothbrushes, make up and make up brushes that are not expired, just remodeled for a new year.  They have so many fun things like school supplies, candies, candles and pot holders.   
  5. Make a list of everyone you want to buy a gift for and keep it in your purse or on your phone under the Notes feature.  This way you can continuously update your list as you make purchases. 
  6. Address the envelopes for your Christmas cards early.  Make it a task to sign a certain number of cards each week to get them all done and in the mail without staying up all night. 
  7. Buy postage early.  Don't get caught standing in line to purchase stamps for your cards.  Did you know that you can purchase stamps directly through USPS.com and they will be delivered directly to your mailbox.  You also have a bigger variety of stamps to choose from online. 
  8. Making cookies and other baked goods for the holidays?  Stock up now on baking essentials like flour, sugar, brown sugar, baking powder, baking soda, butter and vanilla.  Many stores will have sales on these items.  Stock up each week as you see them on sale. 
  9. Need a quick centerpiece for your Christmas gathering?  Fill clear jars and bowls with candy.  Everyone loves candy and during the holidays you will usually find it decorated in festive holiday colors.
  10. After thanksgiving dinner, check out the Black Friday ads and devise a plan.  Did you know that several stores will also offer these same prices online during Black Friday?  And many places offer free shipping with a minimum order.  Make a plan! 
  11. Don't forget about Cyber Monday.  More great deals to be found.  It use to be that waiting until the last minute yielded the best prices.  I think this has changed over the years, and the best deals are well before Christmas. 
  12. Use your good tableware.  Don't wait for that "special occasion".  Make the holidays, and every day, a special occasion in your life. 
  13. And last but not least, don't sweat the small stuff.  Relax and enjoy the holidays with your friends and family.  Make memories. Take pictures. Laugh and enjoy!
Do you have a useful tip that I have forgotten?  Leave a comment below so that we can all work towards a stress free holiday.

Happy Stamping,

Debbie


Sunday, November 5, 2017

Coming tomorrow...Week 7 of 12 Weeks of Christmas


I hope that you have been enjoying the 12 Weeks of Christmas Series.  Check back tomorrow for week 7 and more gift giving ideas for the Christmas holiday.

Happy Stamping,

Debbie

Friday, November 3, 2017

Stampin' Up! Colorful Seasons


In the springtime in Michigan, you will see beautiful flowers blooming with bright pink and white blooms.  Besides welcoming the robins home, and the daffodils and tulips popping out of the ground,  the cherry blossoms are one of the sure signs that spring has arrived.   It's a good thing.

I was pleasantly surprised a few weeks ago to find trees along the side of the road here in Florida, blooming with very similar pink and white flowers.  And, just like the cherry tree blossoms, the Florida tree flowers didn't last long either. But it was nice to see them while they lasted. 

I kept today's card fairly simple, as the beauty of the flowers speaks for itself. 

Here's what I used to create this card:

  • Powder Pink cardstock cut at 5 1/2" x 8 1/2"
  • whisper white cardstock cut at 4" x 5 1/4"
  • colorful seasons bundle (item #145348)
  • powder pink cardstock pieces to cut the flowers
  • melon mambo ink
  • espresso cardstock to cut the tree
  • expresso ink

Here's how I created the card:

  • fold card base in half
  • cut tree branch with framelits using espresso cardstock
  • cut several pink flowers
  • using melon mambo ink and a sponge dauber, sponge ink into the center of the flowers
  • stamp greeting in lower right corner of the whisper white piece using espresso ink
  • attach the tree branch to the front of the card as shown, using tombo glue
  • attach the flower pieces to the branch
  • stamp flowers onto the white cardstock to fill in the branch
  • attach the 4" x 5 1/4" whisper white piece to the front of the card base

I hope that you enjoyed the simplicity of today's card.  Join me on Monday when I will be sharing Week 7 of the 12 Weeks of Christmas and another great idea for gift giving during the holidays.

If you need supplies for this, or any other project, I hope that you will visit my store by clicking here.

Happy Stamping,

Debbie

Thursday, November 2, 2017

Twelve Weeks of Christmas, Week 6


Today I am sharing Week 6 of the Twelve Weeks of Christmas, with a fun do it yourself Christmas gift idea.   I think handmade gifts are the best. Whether it's homemade cookies or candies, jams, jellies or a wonderful hand sewn or crafted item, these gifts always tell me that someone took a little extra time thinking of me.   What's your favorite handmade item you have ever received?

The project I'm sharing today is a lemon sugar scrub.  Who on your shopping list wouldn't like to pamper themselves with a yummy smelling sugar scrub that leaves your skin feeling soft and clean?  I created a lemon sugar scrub, but you can really alter this recipe with any essential oil scent. 

I started with 2 oz. mason jars.  You can also choose larger jars, such as 4 oz. or 8 oz. 


Ingredients

1 cup white sugar
1/4 cup oil (almond, jojoba, grapeseed. liquid coconut or olive will work)
15 drops of lemon essential oil

Add all ingredients to a glass mixing bowl and blend well with a spoon.  Using a small spoon, scoop mixture into the jars.   The sugar scrub will settle in the jars.  I recommend filling the jars, putting the lid on then gently tapping the bottom so that the scrub settles. Add more if needed. 

As an added bonus, you will need to test the sugar scrub out, because all good chefs test their recipes, right?   You're going to LOVE how soft your hands feel, and how lemony fresh they smell. 

I used yellow polka dot paper and punched a circle to cover the top of my lid.  I used Daffodil Delight ink to stamp the lemons. 

The  Stampin' Up! Lemon Zest Clear Mount Bundle (Item #145360)  works perfectly to decorate the jars.   

There are two tags attached, both punched with the lemon punch. I created the wording in Word on my computer.   You will have to see what margins work best on your computer. I created columns then spaced them out to get as many directions as I could on each sheet of paper,  without them overlapping each other.

Tag #1 says Lemon Sugar Scrub.  On the backside, I list the ingredients, just in case someone has allergies.

Tag #2 says "apply a small amount of scrub to your hands and rub it in, then rinse.  The sugar will exfoliate your skin and the oil will leave your hands feeling soft". 

Packaging the Sugar Scrub

To package the sugar scrub, I attached a small wooden spoon, found at Michaels craft store, to the side of the jar, using glue dots.  I placed the jar into a gusseted 3" x 6" cellophane bag, (item #141704). Gather the top and tie with ribbon.   Punch a hole in the top of each tag using a 1/8" handheld punch, and attach using whisper white bakers twine. 

Are you already thinking of who you can give this gift to?  I know that whoever you give it to will enjoy it!

I hope you enjoyed this project.  If you need supplies to create this or any other project, please visit my store HERE and use hostess code 2JZPRHSB at checkout. 

Happy Stamping,

Debbie


Tuesday, October 24, 2017

Home Decorating with Painted Harvest


I love it when I find more than one way to use my crafting supplies.  Don't you?  It makes me feel accomplished, in a strange kind of way.   Today I am sharing a beautiful card I created using the Painted Harvest Photopolymer stamp set. I then took that same image and turned it into a framed piece of artwork that I can give to someone special. 

Please note that this is a two step stamp set, which means the flowers and/or leaves must  be stamped using a layering technique to achieve the above look.   Also note that a Stampin' Pierce Mat may need to be used to achieve even stamping (click the link if you are not familiar with a piercing mat).  A few more tips regarding the painted harvest stamp set: 
  • make sure your ink pads are well inked
  • use nice, even pressure when stamping
  • use the stampin' pierce mat
  • keep in mind that lighter colors won't show up as deeply as dark colors
  • Play around with saturation levels (i.e. stamping full strength vs stamping off) to get your desired look

Here's what I used to create the card:

  • Cherry Cobbler cardstock cut at 8 1/2" x 5 1/2", scored at 4 1/4"
  • Whisper white cardstock cut at 4" x 5 1/4"
  • Crushed Curry 3/8" mini chevron ribbon (item #144197)
  • Painted Harvest stamp set (item #144783)
  • Cherry cobbler, Old Olive, Crushed Curry and Espresso ink

Here's how I created the card:

  • Fold the Cherry Cobbler card base in half and set aside
  • ink the largest flower with the crushed curry ink and stamp onto the whisper white cardstock three times (see positioning above)
  • ink the smaller flower using cherry cobbler ink and stamp over the crushed curry image. Remember that the second layer will not stamp perfectly onto the crushed curry. This set is designed to look and feeling like watercoloring
  • stamp the centers of the flowers using espresso ink
  • stamp the leaves using old olive ink
  • tie a piece of crushed curry chevron ribbon around the center of the card and adhere on the back side of the card before attaching to the card base
 Since all  frames will have different sized openings (mine has a mat inside), you will need to measure the opening dimensions to get a perfect fit.  The frame I used has a mat PLUS it is a shadowbox type frame.  You can choose any style.

If you need supplies for this, or any other projects, I would love to be your demonstrator.  Please visit my store today by clicking HERE and use HOSTESS code B6VKEPA3 at checkout. 

Happy Stamping,

Debbie

Monday, October 23, 2017

Week 5 of the 12 Weeks of Christmas


Remember that cute snowman box that I shared with you last week?  Well this week I have an awesome recipe for you to fill it with this holiday season.   It's a recipe from my mother in law for coffee cake.  She originally started making this recipe while she was in the Jaycees back in the mid 1970's.    She has delighted many people with this coffee cake over the years. 

Our family uses this recipe for brunch, holidays and other special occasions.  It is a recipe that never fails, although my husband likes to joke with me that mine never tastes quite like his moms.   I think that has more to do with childhood memories than the actual coffee cake because the recipe is the same.  Either way, he never really turns down my version when I make it for him, so he must like my recipe too. 

Here's what you need to make this coffeecake:
  • 2 cups flour
  • 1/2 cup of butter
  • 1 cup sugar
  • 2 eggs
  • 1 tsp baking soda
  • 1 tsp baking powder
  • 1/2 tsp salt
  • 1 cup sour cream
  • 1 tsp vanilla
For the topping:

Mix topping ingredients
  • 1/3 cup brown sugar
  • 1/4 cup sugar
  • 1 tsp cinnamon
  • 1/4 cup chopped pecans or walnuts

Directions for making the cake:
  • Mix butter and sugar until fluffy
  • add eggs
  • add vanilla
  • in a separate bowl mix flour, baking soda, salt and baking powder and sift together
Mix all dry ingredients and sift

  • Alternately add the sour cream and flour mixture (1/2 at a time) to the butter mixture
  • mix well
  • spray the bottom of a 9x13 cake pan with cooking spray
  • add 1/2 of the cake mixture to the pan and spread evenly over the bottom of the pan
  • sprinkle 1/2 of the sugared topping over the cake mixture in the pan
  • spread the remainder of the cake mix on top of the sugar mixture being careful not to pull the sugar into the batter.  For this step, I create mounds of batter, as shown below, then use a butter knife to carefully spread to batter
  • sprinkle the remaining sugar mixture over the coffee cake
  • Bake at 325 for 35 minutes, or until cake tester comes out clean

Add the second layer of batter in mounds.  Use a butter knife to evenly spread over the sugar mixture


Enjoy!
I hope that this recipe becomes a favorite of your family, too.  Just know that you are bound to get special requests for this after you have made it once.  Enjoy!

Don't forget to stop back tomorrow for more stamping fun and come on over to visit me on Facebook at Facebook.com/stampitwithdebbie for fun stamping ideas with step by step videos, challenges and giveaways.

Don’t forget to visit my Stampin’ Up! Online store at Stamp It With Debbie’s Online store

Happy Stamping,

Debbie


Sunday, October 22, 2017

12 Weeks of Christmas Week 5


Check back tomorrow for Week 5 of 12 Weeks of Christmas.  I will be sharing a special recipe that you can use during the holidays to impress your friends and family at Christmas breakfast. 

See you tomorrow,

Debbie

Friday, October 20, 2017

Another Sweet Treat for Halloween


It's another sweet treat for Halloween.  This time I am using a Hershey Candy bar.  This treat is made using plain Hershey bars, but I really do like the Hershey bars with almonds.  What is your favorite Halloween treat? 

I created this treat using the Spooky Night Designer Series Paper.  I cut each piece into a 6" x 6" square, so you can get four treats from each 12" x 12" piece of designer paper.  Attach a strip of Tear & Tape adhesive to one of the outer edges, along the whole 6" side, being sure to keep the tape as close to the edge as possible.  Remove the backing.  Place a candy bar in the center of  the square and carefully wrap the candy bar in the designer paper, keeping the side with the adhesive as the top piece.  Secure once you are happy with the 2 pieces being lined up.

I struggle with how to tell you this next step because there is just no good way to say it, except for this one way.  I was recently talking to my friend Leanne and she said "I'm punching cats".  I laughed out loud at the image, even though I know she loves cats, and would never punch them.  So, here goes...  Punch the cat (no literal cat punching here please LOL) using the cat punch.  For these treats I used a piece of black glimmer paper (retired), but you could also use basic black cardstock. The piece behind the cat was punched using the starburst punch and pumpkin pie cardstock.  I used the stamp images from the Spooky Cat Stamp Set to stamp the rat and the "trick or treat" sentiment.The sentiment was attached using dimensionals.   Attach the cat to the starburst piece.  I tied bakers twine and orange ribbon around the candy bars for an added touch, then attached the cat piece using dimensionals. 

Your treat is now ready to give to a friend, neighbor or a special trick or treater. 

If  you need supplies to create this, or any other projects,  I would love to be your demonstrator. Please visit my store HERE, and use hostess code B6VKEPA3 at checkout.

Happy Stamping,

Debbie


Thursday, October 19, 2017

Spooky Halloween Treats


With Halloween just 12 days away, I wanted to share a few treat ideas with you.  As I have mentioned before, I usually have some sort of treat that I've created in my purse to share with others as I run errands throughout the day.   If you have never done this, I would highly recommend you try it sometime.    The look on people's faces is quite often priceless, to say the least.  I have to admit that it's a bit sad to me that people are so surprised that someone is actually doing something nice for them.    Even my husband has seen the difference it makes in people.  As we go through the drive through he will say "hey, do you have any treats in your purse?"   It feels good to make someone smile. 

These cute pumpkin treats were created with Dove milk chocolates, but I have also used Hershey nuggets and Hershey caramel apple bites.  If your chocolate treat is bigger or smaller, simply  adjust the size of the center piece, then add 1/4" to both sides for the score line.

For this project, I started with a piece of basic black cardstock cut at 1 3/4" x 5", scored at 1/4" on both long ends.  This score line creates a lip to hold your chocolates in place.  Place chocolates onto the sleeve and slide into a 2" x 8" cellphone bag (item #141703) If you feel like the chocolates will slide around, you can attach them using a glue dot.  For these treats there are 4 chocolates on the card sleeve. If you would like to add more or less candies, adjust the length of your sleeve (mine were cut at 5").  Tie the top of the cellophane bag with ribbon or twine, as shown.

For the tag topper, I cut a scalloped circle using the layering circle framelits (I used the third from the smallest scallop).  I cut a circle using the smallest the Stitched Shapes Framelits dies and stamped the "Eat at Your Own Risk" image from the Spooky Cat photopolymer stamp set using pumpkin pie ink and the rat using archival black ink. I attached the scallop and circle using fast fuse and then attached this piece to the front of the treat using a dimensional. 

Leave a comment below if you have or are creating treats to pass out, and if you, too, received a positive reaction from them. 

If you need supplies for this, or any other project, I would love to be your demonstrator.  Please visit my store today by clicking HERE.  Please use HOSTESS code B6VKEPA3 at checkout. 

Happy Stamping,

Debbie

Wednesday, October 18, 2017

Stamping with old and new friends


I recently had the opportunity to spend the day with a few friends to talk about our Stampin Up! businesses.  We shared ideas, made cards, had lunch and shared tips to help each other be more successful.   Some of these friends I had not met before, some I have known for some time.   There was no competition between the six of us, even though we are all doing virtually the same thing, just in different places.  We spent the day creating and sharing, and it was so much fun.

One of the things we did at our gathering was a shoe box swap, where everyone brings a card sample, along with items for every attendee to create that card.  The card above was provided by my friend, Frances Wagner. Isn't it beautiful?   The technique is called an eclipse card.   I had seen this type of card before, but I had no idea how it was made.   This particular card uses the Night in Bethlehem stamp set, along with the Large Letters Framelits.  I think the stamping on this card is very simple, yet the technique makes a very bold statement.   As soon as I returned home from our day of stamping, I had to order the large letters to try my hand at designing my own eclipse card.  Stay tuned. 


I am looking very forward to our next meeting, where we can once again stamp as friends and share tips to make ourselves, and each other, more successful in our businesses.  It is my hope that you, too, have friends that you can create with because stamping with friends is always more fun than stamping alone. 


Happy Stamping,

Debbie

Tuesday, October 17, 2017

Snowman Shaker Pizza Box


Welcome to Week 4 of the 12 Weeks of Christmas.  Today I am featuring snowmen and pizza.  What could be better?  This adorable snowman is sure to melt the hearts of whoever you give this treat box to, filled with goodies, of course. 

Did you know that there are officially 68 days left until Christmas???? That's just over 2 months.  And you know that as soon as Halloween gets here, in just 15 days, time is going to fly by with the hustle and bustle of Thanksgiving meal planning, black friday shopping, card sending, tree decorating, gift wrapping, baking and everything else that the holidays bring.   That's why we need to start planning for the holidays now.  So today I am sharing a fun treat holder pizza box that you can fill with candies, fudge or other holiday treats for friends, neighbors or co workers.  

And here he is, cute as can be. 


What I used to create this project:

  • Seasonal Chums clear mount bundle (item #146077)
  • mini pizza boxes (item #144645)
  • dazzling diamonds stampin glitter (item #133751)
  • Layering squares (item #141708)
  • window sheets (item # 142314)
  • pool party cardstock
  • real red 1/8" solid ribbon (item #144631)
  • foam adhesive strips (item #141825)
  • markers, ink pads and blender pens in pool party, cherry cobbler, old olive and pumpkin pie
 

Here's how I created the project:

  • Select the largest scalloped square and the 2nd largest square framelit.  Layer them onto a piece of pool party cardstock on your bigshot to cut a smaller square inside of a bigger square. (see below)  This will create the frame for the shaker card. Save the square that is cut from the center
  • Cut a piece of window sheet to 2 7/8" x 2 7/8" and adhere to the frame using fast fuse or tear n tape

  • Assemble the pizza box
  • Attach the small pool party square to the center of the outer lid of the pizza box
  • Using markers or blender pens, color the snowman.  You will only need to use the front part of the snowman, so carefully cut the back part off and discard. Attach the snowman, using dimensionals, to the center of the pool party square


  • Lay the frame onto its front side and attach the foam adhesive strips to the outer edge where the window sheet is also adhered.  Make sure that the window sheet and the foam strips are securely attached or the glitter will fall out of the shaker card.  DO NOT remove adhesive backing at this time.
  • Make a small pile (as shown above) of dazzling diamonds stampin' glitter on top of the snowman. 
  • carefully remove the adhesive backing from all four sides of the frame
  • Lay the frame on top of the pool party square, adhesive side down,  making sure that the square is centered inside of the frame and being careful not to scatter the glitter. 
  • Make sure that this piece is secured on all four sides so that the glitter does not fall out of the shaker card
  • Tie a bow using the real red 1/8" ribbon and attach using a glue dot
 
If you need supplies to create this, or any other project, click here for my online store Stamp It with Debbie.  I would love to be your demonstrator.  Please use hostess code B6VKEPA3 at checkout. 
 
 
I hope you will stop back tomorrow for more stamping fun.
 
Happy Stamping,
 
Debbie