Friday, March 17, 2017

Lift Me Up Class to Go


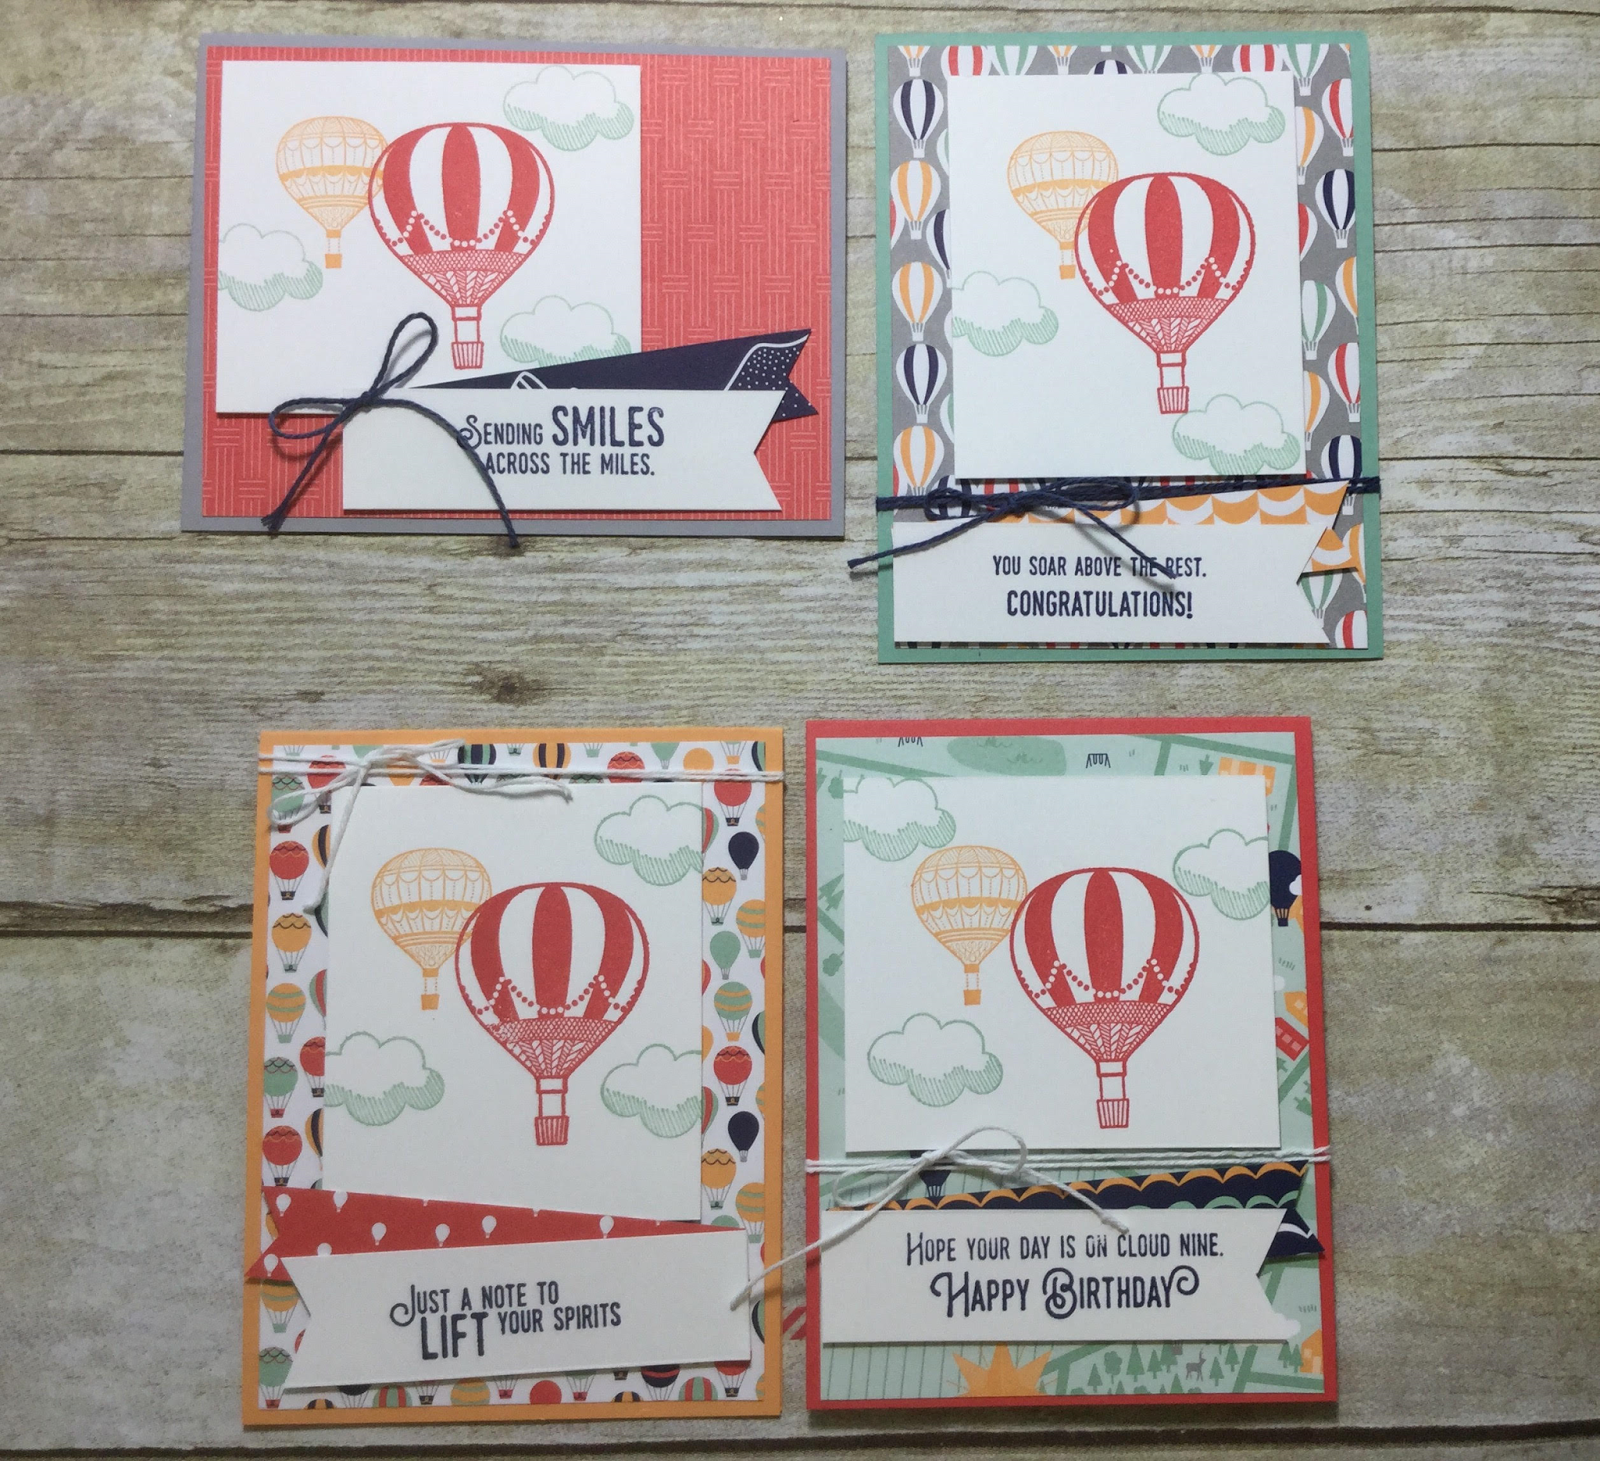
I have a really fun Class in the Mail for you this month.  The class is focused around the Stampin' Up! stamp set Lift Me Up and you can make cards for all occasions using this set.  The sentiments in this set include congratulations, love, happy birthday, thank you, sending smiles and just a note.  You can see the full stamp set HERE by clicking on shop now, then enter item #142896. 

What you'll get in your Class to Go:
  • 12 card bases, 3 each of peekaboo peach, watermelon wonder, mint macaron and smokey slate
  • 12 pieces of designer paper
  • 12 pieces of coordinating twine
  • 12 banners for greetings
  • 12 whisper white cardstock pieces for stamping balloons
  • 12 envelopes
  • 1 sheet of dimensionals
  • Life Me Up Clear Mount stamp set (item #142896)
Additional supplies needed for this class include the following ink pads:  mint macaron, peekaboo peach, watermelon wonder and night of navy.  If you would like to add any of these inks to your order, I would be happy to add them.  Or, you may substitute with colors of your choice.

Cost for this class is just $42.00 and can be paid by check or Paypal.  You may leave a message in the comments with your e mail address, or your may email me directly. 

Deadline for payment and for ordering this class is Wednesday, March 29th.  Supplies will be mailed to you the week of April 10th. 

Thursday, March 16, 2017

What are your favorite summertime Cool Treats?


Do you remember standing on the sidewalk listening to the sound of the ice cream truck driving through the neighborhood?  What was your favorite treat?  My favorite was called a screwball.  Fruity iced goodness with a gumball at the bottom. 

The Cool Treats Suite from the new Stampin' Up! Occasions catalog is one of my favorites, although I will admit I do have many favorites from this catalog.  The cool fruity colors of pool party, watermelon wonder and peekaboo peach scream cool summer fun.

What you need to make this card:
  • pool party card base cut at 11" x 8 1/2" scored at 4 1/4"
  • Tasty Treats Specialty Designer Series Paper cut at 2" x 5 1/4" (item #147770)
  • watermelon wonder cardstock cut at 2 1/2" x 4 1/2"
  • whisper white cardstock cut at 2 1/4" x 4 1/4"
  • Cool Treats Bundle (items #145181)
  • scrap cardstock for cutting ice cream in mint macaron, peekaboo peach, chocolate chip, watermelon wonder, crumb cake for the cone, real red for the cherry
  • watermelon wonder ink
How to create this card:
  • Fold card base in half and use bone folder to crease
  • adhere designer paper to left side of card, leaving a 1/4" margin
  • stamp greeting (I used "you're sweet") using watermelon wonder ink
  • cut ice cream, cone, fudge and cherry pieces and attach to center of whisper white cardstock
  • attach whisper white cardstock to watermelon cardstock and attach the center of card as shown
I hope you will enjoy this fun ice cream treat card.  If you would like to order supplies for this, or any other project, I would appreciate if you would select me as your demonstrator.  Please visit my store at stampitwithdebbie.stampinup.net.  Please use hostess code CABQWANX at checkout.


Wednesday, March 15, 2017

Stampin' Up! Hey, Chick

I wouldn't normally post using the same stamp set two days in a row, but today I created another card using the stamp set Hey, Chick because I didn't want you to miss out on this FREE stamp set from Stampin' Up!   This is a Sale-a-Bration stamp set, and is only available while supplies last.  If you are not familiar with Sale-a-Bration, it's a special time of year where Stampin' Up! allows everyone to choose a free product from the SAB catalog when they purchase $50.00 or more in merchandise.  If you purchase $100.00, you get to choose two items for FREE.  Isn't that so exciting? 


Growing up, I remember my Grandpa Maneke raising chickens and I have many fond memories of those times, except of course the time when he told me to choose a chicken.  Which I did.  And then I found out it was dinner.  His chickens were always white, but I always dreamed of having chickens on a farm, and they would be very colorful chicken, like these. 

What you need to make this card:

  • crushed curry cardstock 8 1/2" x 11 scored at 4 1/4"
  •  basic black cardstock cut at 3 3/4" x 5"
  • whisper white cardstock cut at 2 1/2" x 4"
  • designer series paper strip cut at 1 1/2" x 4 3/4" (I used Festive Birthday DSP item #141630)
  • 2 1/8" x 1/2" whisper white banner for greeting
  • gorgeous grunge stamp set (item #130517)
  • Hey, chick stamp set, sale a bration (item #143331)
  • basic pearls (item #119247)
  • Tree builder punch (item #138295)
  • aqua painter
  • water color pencils (item #141709)
  • crushed curry, sahara sand, memento inks and real red marker
How to make this card:
  • fold the crushed curry card base in half and use bone folder to crease score line
  • attach basic black 3 3/4" x 5" at an angle
  • attach designer paper to the left edge of the basic black cardstock
  • stamp chick images onto the 2 1/2" x 4" whisper white cardstock using memento ink and stamp-a-ma-jig
  • color chicks using watercolor pencils, crushed curry ink and aqua painter (I colored the top chick using the basic gray watercolor pencil then washing over with the aqua painter.  I colored the bottom chick using crushed curry ink and the aqua painter)
  • stamp speckles randomly using the gorgeous grunge stamp and sahara sand ink
  • attach the stamped image to the front of your card
  • stamp greeting onto the whisper white banner using memento ink
  • punch 3 flowers using the tree builder punch and real red card stock.  Attach basic pearls to the inside of each flower.
If you would like to order supplies for this card or other projects you would like to create, please visit my store at stampitwithdebbie.stampinup.net and use hostess code CABQWANX at checkout.  I would love to be your demonstrator. 

Tuesday, March 14, 2017

What could be more fun than hanging out with a bunch of chicks?

I finally had the opportunity to have a stamping day with one of my favorite Sale-a-Bration stamp sets in the Stampin' Up! catalog.  This stamp set is called Hey Chick!  And it features some of the craziest chicks I know. 

This stamp set features three chicks, an egg (with feet) and three sentiments.  And did I mention that you can get it for FREE?  During the Sale-a-Bration event being held by Stampin' Up!, you can get this, or any of the Sale-a-Bration products,  absolutely FREE when you make a purchase of $50.00 or more in merchandise. 

If you would like to place an order, you may shop now by clicking RIGHT HERE!!!  Please use hostess code CABQWANX when checking out to be included in a special prize drawing I will hold for every 10 orders I receive.

The card I made today is a special fold that allows the card to stand up on its own, yet it can be folded to be mailed in a regular envelope. 


Here's what you need to make this card:

  • real red card stock 4 1/4" x 11"
  • (score real red at 1/2", 2", 4", 5 1/2")
  • crumb cake card stock at 4" x 5 1/4"
  • two pieces of crumb cake cardstock cut at     1  3/8" x 4 1/8" and 1 7/8" x 4 1/8"
  • layering square framelits (item #141708)
  • hexagon dynamic textured embossing folder
  • hardwood stamp set (item #133035)
  • hey chick stamp set (item #143331)
  • enamel shapes brights (item #141680)
  • crushed curry ink, cajun craze ink, soft suede ink, real red marker
  • basic black cardstock 1/2" x 1 1/2"
  • versamark and white embossing powder
  •  1 3/8" circle punch


Here's how I made it:

  • Score the 4 1/4" x 11" cardstock at 1/2", 2", 4" and 5 1/2". 
  • Place the 4" x 5 1/4" crumb cake cardstock into the hexagon embossing folder and run through the big shot
  • Punch a hole in the upper left corner of the crumb cake card stock using the 1 3/8" circle punch
  • stamp the crazy haired chick on a scrap piece of whisper white cardstock and color in your choice of colors.  I used crushed curry, real red and cajun craze.  Adhere this piece so that the chick is peeking out of the hole.  Adhere the crumb cake piece to the top part of the real red card base.  (where there are no score marks)
  • Fold all score lines and place adhesive on the 1/2"  tab on the end of the card base.  Fold this up towards the crumb cake piece to form a box.

  • Run the 1 3/8" x 4 1/8" and 1 7/8" x 4 1/8" pieces through the hexagon embossing folders and adhere to the front of the box as shown. 
  • Choose 2 layering square framelits (one bigger one and one that fits inside) to cut the doors for the front of the card. Run these through the Big shot.  Stamp the hardwood stamp onto these pieces and adhere to the front of the card as shown.
  • Stamp the other 2 chicks onto whisper white cardstock and color in desired colors.  (I used my aqua painter for coloring) Cut each chick out using your paper snips.  Adhere to the front of the card using dimensionals.
  • place 3 enamel dots on the upper part of the card under the circle cut out.
  • tie a bow using linen thread and adhere with a glue dot
  • stamp a greeting onto basic black cardstock using versamark and emboss using white embossing powder.  Adhere to your card. 
This card can be folded to fit into a medium envelope (item # 107297 crumb cake). 


Monday, March 13, 2017

Stampin' Up! Big On Birthdays

I was recently in the post office and I saw a display that said something to the sorts of "mail a card to their mailbox, not their in box".  What do you think of that display?  Do you mail cards to friends and family, or do you text or email birthday greetings? I get absolutely excited about going to my mailbox and finding a card with a personal greeting inside from a friend.  There is power in the mailbox. 


 Today's post is all about Birthdays.  This stamp set, Big On Birthdays,  has lots of big, bold Birthday greetings.  I paired the greeting with a few balloons from Balloon Adventures and the Party Animal Designer Series Paper.  With all of the different paper designs in this paper pack, you could easily create a variety of birthday cards to mail out.

Here's what you need to create this card:

  • 8 1/2" x 5 1/2" pacific point card stock scored at 4 1/4"
  • 4" x 5 1/4" whisper white cardstock
  • 2" x 3 3/4" party animal designer series paper (item #142738)
  • 2 1/2" x 4" pacific point cardstock
  • 2 1/4" x 3 3/4"  whisper white cardstock
  • Big On Birthdays stamp set (item #142877)
  • Balloon Adventures stamp set (item #142823)
  • pacific point ink, memento ink and tangerine tango ink

Fold the 8 1/2" x 5 1/2" piece of pacific point card stock in half using a bone folder the crease the edge.  Attach the piece of 4" x 5 1/4" to the top of card.  Adhere the piece of designer paper to the left side of the card, leaving a 1/4" margin on the left side.  Stamp the Happy Birthday greeting onto the 2 1/4 x 3 3/4" piece of whisper white cardstock using black memento ink and then adhere to the 2 1/2" x 4" pacific point cardstock. Adhere this piece to the center of your card.  Stamp 3 balloons using the balloon adventures stamp set then punch out using the balloon bouquet punch.  If you do not have the stamp set, you can punch 3 balloons using different colors of cardstock.  Attach 2 of the balloons to the front of the card, attach the 3rd balloon using a dimensional.  Tie a bow using white bakers twine and attach using a glue dot.   

Last step, mail those cards out to your friends and family!!!!

Sunday, March 12, 2017

Stampin' Up! Little Cuties...So Much More than baby cards

For today's card, I wanted to show you that sometimes a stamp set may seem like it has one use, however it may really have many uses.   This stamp set is called Little Cuties.  At first glance, this set would offer many great possibilities for baby cards and other projects, don't you think?  But check out the sentiments included in this set.   Now that I'm looking with a more creative eye, I'm thinking birthday, easter and baby.  For all ages, not just little ones. 


 Here's what you'll need to make this card:
 
  • 8 1/2" x 5 1/2" Whisper White card base
  • 1" x 3 1/4" whisper white
  • 1" x 3 1/4" cupcakes & carousels designer stack paper (item #142744)
  • Little cuties stamp set (item #142990)
  • Suite Sentiments stamp set (item #142971)
  • Emerald Envy Ribbon (items #142742)
Score white card base at 4 1/4" and fold in half.  Stamp the sentiment Everyone Needs a friend like you from the Suite Sentiments stamp set onto the 1" x 3 1/4" whisper white piece.  Using your paper snips, cut the ends to form a banner on the right side.  Repeat the banner process on the  1" x 3 1/4" carousels and cupcakes designer stack paper piece.  Stamp your two favorite cuties (I used the dog and cat) onto the lower right hand corner of the card base.  Color these cuties in with your favorite markers or colored pencils.  I used the new Watercolor Pencils (item #141709).  Attach the two banners as shown on the example above.  Tie a bow with the Emerald Envy ribbon and attach with a glue dot. 
 
If you need to order any stamping supplies for this, or any other project, I would be happy to be your Stampin' Up! Demonstrator.  Click here to visit my store:   stampitwithdebbie.stampinup.net or contact me directly through email.

Saturday, March 11, 2017

Stampin' Up! So In Love


There is always something to celebrate, but today I am celebrating the Stampin' Up! Occasions stamp set called So In Love. I'm excited that this set can be used to celebrate so many happy occasions.   There are so many simple stamps in this set, yet you can create so many beautiful cards.   What do you think about the embossing folder, Falling Petals?  It looks very different in the catalog I must admit.  

Here's what you need to create this card:

  • 8 1/2" x 5 1/2" card base blushing bride
  • 4" x 5 1/4" blushing bride embossed with Falling Petals embossing folder (item #142761)
  • So In Love stamp set (items #143216)
  • Gold embossing powder
  • 3/8" metallic ribbon (Sale-a-bration item)
  • Layering circle framelits
  • black and vanilla cardstock  for stamping flower and banner
Score card base at 4 1/4" and fold in half.  Emboss the 4" x 5 1/4" piece of blushing bride using the Falling Petals embossing folder.  Tie a knot around this embossed piece, then adhere to the front of the card base.  Cut a piece of vanilla cardstock to 1" x 3 1/4" to create a banner.  Stamp your greeting using Memento Black Ink.  Stamp flower image using Versamark and gold embossing powder.  Set the embossing powder using the heat tool.  Sponge blushing bride ink onto the flower using a small sponge or finger dauber.  Adhere the banner to the front of the card.  Cut a scalloped circle just slightly larger than the vanilla circle, using black cardstock.  Attach the vanilla circle and the black scalloped circle together, then attach to the front of the card using dimensionals. 

I hope you'll stop back tomorrow to see another project featuring a new stamp set from the Stampin' Up! Occasions catalog.  Celebrate today.